
WALKTHROUGH PT. 3
QUESTS:
Note: Top-end parties (characters at roughly 700+ HP) level out the difficulty of many dungeons (most fixed enemies will appear very weak). This page is just a continuation of the previous section, there is no real order, except maybe that Dragon Rulers and Asuras are the toughest things around (so if you like challenge, face them rather early). Needless grinding (which is any grinding at all in RS3) makes the endgame very boring: be forewarned! (unless you are a bully and enjoy squashing bugs, ofc). Also, check this alternative quest completion order depending on fixed enemies' Up/SparkLV.
・AURORA TONIGHT: SNOWMEN IN THE ICE GALAXY (LANCE, AURORA PATH/ROAD, SNOW TOWN/FROSTBURG, ICE GALAXY)
・THE ROTTEN SEA RUINS (ROTTEN SEA)
・[HARID/KHALID ONLY] THE RUINED CAPITAL OF KINGS OF OLD (KINGS' CAPITAL/CITY OF KINGS)
・LEONID'S GRAIL (PODOL/PODORUI, LEONID'S CASTLE)
・EARTH ABYSS GATE (PIDONA, DEVIL KING/ARCHFIEND PALACE)
・INTERMISSION: THE LAST GATE?
・THE PHANTOM MAZE [REMASTER ONLY]
・TO HUANG CITY: MARCH & SNEAK (XUAN CITY, HUANG CITY)
・INTO THE ABYSS AND BEYOND
・ENDING (THE NEW WORLD)
AURORA TONIGHT: SNOWMEN IN THE ICE GALAXY (LANCE, AURORA PATH/ROAD, SNOW TOWN/FROSTBURG, ICE GALAXY)
This quest can be done much earlier, the requirements being having cleared the Ice/Arctic Lake and 350+ HP. You know you qualify if you go see Anna in Lance, ask About Aurora and get a different reply than usual ('It seems to come close tonight'). Now go to the World Overview Map (X button on the World Map) and wait for nightfall and the Aurora to appear (about 1 min 30 s). Go back to the World Map: you can now access the Aurora Path/Road.


Take that path and wait for the Aurora, a metaphysical phenomenon remnant of a future psychedelic past.
You are taken and washed away through the stars to unknown (frozen) shores.


Snow Town (Frostburg)!
You need to try to talk to the snowman (our very own Yukidaruma) at the back in the basement of the 2nd house,
to make them all stop pretending and move. A pretty funny scene of heart'warming' welcome.


All the snowmen save one say the same things, spouted randomly (this is the only place in the game – with Kidlanto/Kyrdlund – designed thus: if you ask me they are all robots in snowmen's guise, haha): they can't leave the city without the Eternal Ice/Everfrost Crystal; the last guest was here 300 years ago; we can access the Ice Galaxy from the storeroom (...).
If you have a party of 5 or fewer, you can recruit Snowman (the one you tickled) (arbitrarily named Flurry in the Remaster).
We learn from him that he has journeyed with the last 'guest' – the Holy King (Matriarch).
Unfortunately, there is not much to do in town.
You can rest for free in the cave (their 'Storeroom / Hearthside Cabin') near the entrance.
Then enter the door at the back and follow the path to reach the Ice Galaxy.

Just a few enemies: Aquatic, Beast, Giant, Fairy.
Equip your Hypnotize Evade Skill for the Cyclops.
Run over the gaps inbetween icebergs. There are several paths, all leading to the same place.
Right after a stationary Fairy, you can grab the Eternal Ice/Everfrost Crystal, held by an ice sculpture (?).
A little further, guarding the Ice Sword/Everfrost Blade: the White Dragon Ruler/Lord.


Change the atmosphere with magic or elemental attacks to prevent the Dragon's HP regeneration. Set up shields at the same time, if needed. Watch out for Tail Sweep/Swipe (use formations like Speculation) and Cold Air/Frost (it is possible to negate its Cold / Water attacks with the adequate equipment). Its Freeze Wall/Frigid Veil counter can be annoying (use ranged attacks)(or tank). It is the weakest of the Dragon Rulers. Defeat it and claim the Ice Sword/Everfrost Blade.
Or not! If you don't take the sword and leave the screen, you can fight it again. And again.
Until you get what you were looking for (small chance that a Dragon Spear/Sm'augg might drop) or had enough.
Then you have to go back on foot to Snow Town, in an Ice Galaxy now void of enemies.
If you had Snowman in your party or if you recruit him now or later, and try to leave Snow Town, you will be given the choice to give Snowman the Eternal Ice/Everfrost Crystal if you want to have him with you (a refusal is not definitive: just try and recruit him again). The Eternal Ice/Everfrost Crystal is a pretty mediocre, one-use-only, hit-all attack scroll. It would probably be much better in Snowman's care: it turns into an unremovable accessory, that provides extreme resistance (128 Def: near-immunity) to Hot and Cold, and allows HP regen in Water environment.
Note: The Ice sword//Everfrost Blade is arguably the best Greatsword, but it must be equipped on a fast character: if you get hit before your character acts, the Freeze Wall counter activates and you lose your turn. It also delivers a unique regular Slash+Cold attack and has a good hit-all, INT-dependent, built-in tech: Misty Ice/Arctic Rush.


THE ROTTEN SEA RUINS (ROTTEN SEA)
You should have heard of the Rotten Sea Ruins from the elephant in the central building of Rashkuta.
It may have once been a fine Elephantesque city, but that was before it was swallowed by a putrid swamp and infested by monsters.
Of course we should take a peek: there's always something in it for us.

Enemies: Skeleton, Beast, Inorganic, Beastman, Skeleton, Ghost, Demon, Fairy.
Loot: Crocodile, Screamer, Hawkwind/Falconwind, Will/Willguard, Troll Stone, Wing Charm/Amulet, Life Elemnt/Root of Life, 3000G.


The Rotten Ruins are a bit more of a maze than usual (but that doesn't mean much, haha) and the atmosphere & the graphics are really nice.
The real treat here is at the end of the Ruins, when you open the last chest (inside, the great Will Guard): the Green Dragon Ruler/Lord.
It is a ferocious beast with 22k HP, that hits twice per turn. Poison Gas can be particularly devastating (equip items with Status resistance & Poison immunity). Setting a working Dancing Leaves or Water Ball (i.e. with the matching magic environment) around your most exposed character also works wonders.


There is a very slight chance that it may drop a Dragon Spear/Sm'augg, the best spear in the game; but given the odds you might find one in two or three dozen playthroughs (it is possible to fight the Dragon Ruler of the Ice Galaxy as many times as you want; abusing an emulator may be an easier option; but you may just want to play the game as it was intended to be! as you probably should).
Anyway, you're done here, congratulations!
Note: Shortcut Glitch
On your way back, you can experience a glitch that makes it (your way back) shorter.
On the broken stone bridge, outside, stand on the right side of the bridge, on the edge, near the top, run left and press right just after jumping: you land on the wooden bridge below, which is by the entrance. By the way, if after landing you press left, you can climb back to the upper stone bridge. Weird!


[HARID/KHALID ONLY] THE RUINED CAPITAL OF KINGS OF OLD (KINGS CAPITAL/CITY OF KINGS)
The Kings Capital/City of Kings is Harid/Khalid's own special dungeon, in search of his Princess, or of something else?
You can unlock it in Librof/Ryblov and it is located South of the Divine/Archlord Tower.
There are eery faces on the walls, and the music is quite refreshing!


Here, Harid/Khalid can fight as many Asura enemies (the stationary Demon, see map) as he wants, and obtain his strongest weapon, Kamsheen/Khamsin.
Here also you decide of Harid's ending sequence (take the Kamsheen or not).
Harid can enter this Capital of Kings of old as soon as he goes to Librof/Ryblov for the first time, which means that you can loot this place very early in game (boss excepted, a bit hard, as expected). You can come back for Asuras and the boss when you have the adequate level and skills (endgame).

Enemies: Beastman, Serpent, Skeleton, Undead, Fairy, Spirit, Ghost, Amphibian, Demon.
Treasures: Kamsheen/Khamsin, War God/Bujin Armor, Ghost Hand/Wargod Bracers, Bloody/Sanguinator, Hurricane/Cyclone Shoes, Slit Hammer/Sledgehammer, Barrier Stone, MPotion 3/Divine Liquor, Tpotion 3/Mind Salts, Life Elemnt/Root of Life, 4000G.
Deep within is found a very large tomb (with 2 lesser tombs that house Red Dragon Zombies).
Check it: we learn a bit of info about Harid (the reason why his first slot is named Kamsheen: he longs for the original Kamsheen).


Then accept twice to fight the Black Dragon Ruler (Dragon Lord), 24k HP, fangs & claws.


His Heat-based Acid Spray attack can hurt: equip adequate items (the best being probably Hid. Leather/Hydraskin Vest: immunity to poison & heat-resistance).
Dragon Smaug Spear may or may not drop... but Harid/Khalid inherits the real Kamsheen/Khamsin in any case.
Nevertheless, his Princess was nowhere to be found...
LEONID'S GRAIL (PODOL/PODORUI, LEONID'S CASTLE/CASTLE LEONID)
After winning the tournament in Zweig, you were asked to retrieve the Holy Grail, which is in the care of Leonid the Vampire, in his Castle near Podol/Podorui. Let us do just that now.
(If you plan on recruiting Leonid, you should probably do this quest as early as possible.)
Leonid's Castle is just North of Podol/Podorui (Leonid's own maiden livestock fridge), separated from the village by a short hostile snow field.

Enemies: Demon, Undead, Ghost, Skeleton, Inorganic, Spirit, Fairy.
Treasure: Holy Grail, Dusk/Twilight Robe, Bloody/Sanguinator, Rune/Runnic Staff, Moon/Lunar Bone, Guard Ring/Ring of Fending, Drgn Scales/Dragon Scale, Barrier Stone, Tpotion 2/Strength Salts, Mpotion 2/Spirit Liquor, 1200G.
In the Castle, talk to Leonid, who invites you to fetch the Grail if you can, and disappears.


On the right you can rest for free and tour part of the roof.
On the left is where we go. 5x Warbat (stationary Demon) await at the top of the stairs.
Further down, stationary Undead enemies: possibly strong Pois Gion/Poison Gigant x2, here to test your party's ability to proceed deeper, and 3x Red Dragon Zombie.
Later, a stationary Skeleton (Mortalghost/Mortar Ghost).
In this same section, in the two small chambers, things (Inorganic, Spirit) jump at you from the urns if you touch them, and from the green fire if you try to have a taste of human blood in a nice glass.


The next room has four doors in all (over 2 levels), which is incredibly rare in RS3 (usually very straightforward). The door in front of the one you came from leads to a library, in the depth of which an interesting trio of wolves (Ground Wolf/Lobo, Sky Wolf & Werewolf as a stationary Beastman) guard a study and an anticlimatic Bloody Sword/Sanguinator; but they can do X-Attack, Time Gap Atk/Delayed Attack & Jack Knife (Commander Mode attacks, like the Great Thief/Carmine's band at the beggining of our adventure), which is pretty cool. At the back, the upper door leads to two chests (Moon Bone & some G) and the lower door allows you to move forward (stationary Inorganic: Smart Gel/Gel Matter).
The next stationary Skeleton is the boss, Yami.


Change the atmosphere with magic so that Yami does not regenerate (Sun or Moon to counter Abyss; take this opportunity to set up your shields, with the appropriate magic environment, as usual). It has a horizontal Electricity attack so possibly change your formation accordingly. Its Plasma Net (1P, insta-death, Evade-able), Face Hit (physical dmg to all, Evade-able) and Death Widow (all party, causes various status ailments: poison, confusion, silence) can be annoying. Once you have dispatched it, get the precious Drgn Scales/Dragon Scale (crafting material) in a chest at the back. In this same room is also the (semi-)hidden entrance to a room nice and cosy with a (fake) Dusk/Twilight Robe.
Leonid is waiting for you a little further with the Holy Grail and you are magicked out: Castlevania Complete!


Note that you must have one free slot in your inventory to receive the Holy Grail, otherwise it is lost.
It is possible to go back to the depths of the Castle, but there is nothing at the end. You cannot even open the large coffin that seems to be looking at you with those piercing red eyes... So many unsolved mysteries!
On the other hand, you may now recruit Leonid if you have the Holy Grail with you and 5 or fewer party members.


EARTH ABYSS GATE (PIDONA, DEVIL KING/ARCHFIEND PALACE)
We already went in the Devil King/Archfiend Palace to help Sharl/Charl find Gon, a looong time ago. Let's go deeper down now.
Enemies: Beastman, Insect, Inorganic, Serpent, Skeleton, Demon, Fairy, Aquatic, Undead, Ghost.
Loot: Spider/Spyder, Demon Belt/Raksha Belt, White Tiger/Byakko Armor, Elder/Elderwood Bow, Wonder/Wondrous Bangle, Fishscales/Fish Scale, Meteo Frag/Meteorite Shard x3, Barrier Stone, Mpotion 2/Spirit Liquor, Edelweiss, 1000G, Multi-magic Light wall.

The team in charge of the graphics did an awesome job rendering the sheer immensity of the Devil King/Archfiend Palace.
At some point (West wing), a stationary Flying enemy speeds towards you if you approach: 3x Blazer, in a tougher version of the usual.
In a chest (West wing), a mysterious message about praying to death... (a must-read to complete the Ancient Ruins and ManaSword's Quest).


Midway (South of that large room with pillars, before you come out on the open again), a stationary Fairy enemy guards a portal: defeat it to gain access to a very convenient warp door leading to the very first room of the Palace! (because we will have to come back here anyway).
When you have reached the throne room and a talking door ('the ring...' ooooh), head back to the surface and go to Lance to the house of the descendants of the Holy King/Matriarch (top-left): upstairs, the moustached man will give you the Royal Ring, which is the key to the door you couldn't open (and to a possibly infinite purse). Note that you can and should do this part very early ('Gon Quest'-early!), the Royal Ring being a great item (which can also be duplicated). Anyway, we can head back in now (bring the ring with you, eh).


In the second part of the Palace, the graphics change and some of the monsters are upside down behind what appears to be glass floors... but if you touch them you spark a battle as usual.

Quickly, you reach a crossroad with a large dark red-ish crystal, which is in fact a teleporter (directly to the 4th crossroad below, and the boss, but you would miss on nice treasures). The way forward is North.
Follow the path and meet a stationary Beastman: 3x Arake Demon/Alloces's Ogre, which is the local Beastman fixed enemy from now on (careful: they can use Pheromone and two at the front can do combo attacks).


2nd crossroad: West is the Storm Dragon and a precious Meteo Frag/Meteorite Shard (crafting material). South to move on.
3rd crossroad: North is a Red Dragon and another, most welcomed, Meteo Frag/Meteorite Shard. West to go deeper still.
4th crossroad, with the 2nd teleporter (allows you to go back to the surface quickly if you need a break). South, 2 Minotaurs keep watch on the multi-magic Light Wall and greet you with X-Attack and Dbl/Dual Impact (1000+ dmg to one target, ouch). East is a third Meteo Frag/Meteorite Shard, guarded by a Giant. North is the way forward.


More pesky Arake Demons/Alloces's Ogres (learn Blade Roll/Rolling Slash Evade if you have not already), before you reach the Earth Abyss Gate.


... where you find Sarah! if this is indeed your 4th Gate.
(And Shonen, the Young Boy you have met in various pubs, who has always been rather cold, if you remember.)
But for now the phantom of Arakes (Alloces) has come. Some bombastic entrance!


Arakes/Alloces' confusing Terra Voice/Terrifying Wail (equip Sonic-immune B. Dragon/Soryu Armor, Silver Trail/Mail or, better, White Silver/Silver Armor) and hit-all Earthquake & Big Rotation (equip Earthquake/Shivers & Blade Roll/Rolling Slash Evade skills) can be trouble. He also uses Rear Burn a lot (nullified by fire counters like Self Burning), is immune to Sonic attacks, and Earth environment heals him. There are other Evade Skills you can equip if you have them, or learn if not (see the Bosses section). Set up magic shields, do the usual and defeat this big beast. Done? Good! another one down.
Don't forget to grab Earth magic 'strongest spell' Super/Hyper Gravity (yeah) from Anna in Lance.
INTERMISSION: THE LAST GATE?
But if that was your 4th Abyss Gate, the Gate does not close but opens instead!
Sara & Shonen were the destined children that had survived the last Death Eclipse...


Sara takes on herself to close the Abyss and pushes Shonen aside.
She disappears from this world...
Back in Lance, Johannes, Anna's brother, notices a gap between the stars:
there is one last Abyss Gate, in the East, beyond the Wasteland.
(Johannes says that no one has ever crossed the Wasteland, which may mean that at some point the developers had wanted you to head East only after closing the 4 Gates, which obviously changed at some other point, given the rather low level of the Eastern entry gate, the Sundines, and the subsequent dialogues with Bai Meiling/Meiniang. And actually there are special cutscenes and dialogues if you reach the East after closing the 4 Gates.)
And off we go to save Sarah!


ALT: If your main character is Sarah, Shonen/Young Boy sacrifices himself to close the Gate.


If Shonen/Young Boy was in your party, there is a visual glitch during the sequence (Shonen in the sky with diamonds). Also (thanks a lot for that), all the items he had equipped are now in your inventory. Now, as you might know, neither Sara nor Shonen will be with you for the final battle: it is strongly suggested to get a 6th character in Shonen's stead now and/or strenghen your party by gearing up and completing some remaining side quests. When you are ready, off you trot to the next section.


Note: At this point, in the Remaster Edition, there is an extra scene (rather out of nowhere). Your dream that night hints at the Flowing Sands. In that dream the Matriarch warns you that the fifth Gate is a trap laid by the Archfiend, whom you see in a conversation with the Sinistrals. At this point too, you can complete the Phantom Maze.
THE PHANTOM MAZE [REMASTER ONLY]
After saving Muse from the Nightmare, go see Anna in Lance and ask her about the 'serum': this opens the Phantom Maze location, near Pidona and Ryblov.
The section bosses and Yama are detailed more specifically in the Boss Page > Main Monsters' Actions & Techs >Phantom Maze.


The Phantom Maze is the extra dungeon of the 2019 Remaster Edition, in which three characters go 'what if..?'.
It is the only place where the enemies are all fixed and follow a predetermined path.
It completely breaks the game as the most uncommon enemies are now readily available for farming (items and Ward skills). There is no incentive to roam the world anymore. Nevertheless it is consistent with the changes observed in the Remaster: whenever possible things are made easy and obvious, handed to the player on a silver plate..
Anyway, at the entrance, a Sphinx is waiting for you. Protect yourself against Insta-Death and defeat it to proceed.

・Floor 1: Khalid's Regret
In the Phantom Maze, you cannot see the path (the real name of the dungeon is 暗闇の迷宮 = the Labyrinth of Darkness, which makes a lot more sense): you must guess your way out... Monsters follow the path so they can be of help. The map above shows the way, because it can be quite annoying.
Enemies:
1) Plant (Rose Spider x2, Marchenrum x2 / Sindy x2, Traentino x2).
2) Plant (Shrieker x2, Funghoul x2 / Torturer, Venus Mantrap x3), Insect (Beetle, Arachnoid, Storm Bee x2 / Arachne x4).
3) Plant (2x Brunhilde x2, Sunflower / Brunhilde x2, Wet Ruby x2), Insect (Sand Flapper, Desert Trap, Scorpion / Berserker, Buggah, Aleph).
4) Fairy (Dancer, Belladonna, Faye x2 / Vanadis Faun, Nyxer x2), Spirit (Kamaitachi x2, Terrawarden x2 / Rayne x2, Eventide x2).
5) Fairy (Enabler, Minity, Echidna / Evoker, Alv, Lilith), Spirit (Aeriel, Foehn, Windbloom / Pyroclast, Plasmid, Magmite x2).
The enemies you might want to fight: in zone 3 the Berserker, Buggah & Aleph (drop Reinforced Armor, a Workshop material), and in zone 5 Alv (drop Gekkabijin, steal Invincible East), Evoker (drop Moonlight Robe) and Enabler (drop Sunflare Robe).


When we meet Khalid's corporeal unfulfilled wish (or whatever), we learn that during the battle between the Divine Order and the Gessiah Dynasty, Khalid entrusted his Princess Fatima to Ludwig and stayed behind to buy time to allow them to escape; unfortunately, something happened to the Princess (she most likely died, as we suppose when adding the information we get in Khalid's Remaster 'Princess' ending, in which it is hinted that Sarah and Young Boy's power resurrected her). But what if Khalid had protected her himself? ...
The Pale Nymph does not give you the opportunity to find out.
Protect yourself against Sleep & Confusion and defeat her: you get the Princess Necklace (WIL+5), which 'suits' Khalid best (bonus CHA+5).


The teleporters you will find from now on will act as relay points to which you can go straight from the start of the Maze: good.
・Floor 2: Tatyana's Regret
Enemies:
1) Beast (Lobo x2, Barghest x2), Beastman (Crypton, Bruiser, Goblin x2).
2) Beast (Irate Simian x2, Sky Wolf x2 / Triceratops x2, Hogrider x2), Beastman (Ogre, Cryptkeeper, Hobgoblin / Werecat, Werewolf).
3) Beast (Cerberus, Elder Ape x2 / Chimera, Nue), Beastman (Ogre Warrior, Ogre Lord / Dobby, Dobby Don, Icarus x2).
4) Undead (Phantom Soul, Flesheater, Shambler x2 / Ghoul Gulper, Revenant, Putrid Giant), Inorganic (Gel x2, Slime, Melting Man / Jelly, Gel Matter, Slugmite x2).
5) Undead (Dragon Zombie red, purple, green / Venom Lich x2, Golden Baum), Inorganic (Ooze x2, Death Colada x2 / Edimmu, Carpenter, Poison Gigant).
Of possible interest are, in zone 2 Cryptkeeper (steal Runic Staff), in zone 3 Cerberus & Chimera (drop Ignus Leather), Nue (drop Morax Leather), and in zone 5 Golden Baum (drop Troll Stone).
Upon meeting the Phantom Tatyana, we learn that she ran away from Ryblov after finding out that her sister Vera and second brother Boris had tried to poison her to inherit the family house. But what if she had confronted them? ...
What Ifs are Nots!, reminds Taotie. Protect yourself against Dark, equip the adequate Wards (Net, Life Steal) and defeat the beast to get the Mage Ring (MAG+5 & spell raw MP cost/2 - cf. this Note on MP cost calculation).


At this point, if you want to move forward you need to have closed all 4 Gates, otherwise the power of the Abyss is too strong and you cannot enter the next portal.
・Floor 3: The Young Boy's Guilt & the First Nightmare
The next two floors deal with Shonen.
Upon entering this section, you are shown scenes that detail how the Young Boy thinks he brings misfortune and death to all around him, including to Sarah (if she is not your main character, that is, but if she is he is happy that he could sacrifice himself to save her). The various main characters react in various ways.


Enemies:
1) Ghost (Firespit x2, Lurker, Ghost / Wicked Cocoon, Frostspit x2), Skeleton (Skeleton, Eerie Skull, Hraesvelgr x2 / Balisudra, Elm Bird, Haunted Skull).
2) Ghost (Tao Master x2, Dead Eye x2 / Ghast x2, Red Heel x2 / Nioh, Avalokite, Vidyaraja), Skeleton (Bladewraith x2, Bone Drake / Skull Titan / Nosferatu x2, Abyssal Drake).
3) Demon (Imp, Achene, Warbat x2 / Gargoyle, Soilfish, Oannes), Flying (Pterodactyl, Biter, Helldiver / Blazer, Sundiver, Raving Eagle).
4) Demon (Minotaur, Mad Jester, Reaper), Flying (Green Dragon, Stormer).
5) Demon (Asura / Raksha, Juggernaut, Colossus), Flying (Gryphon x2 / Black Dragon, Wyvern).
Monsters of interest: in zone 2 Skull Titan or Abyssal Drake (to learn the Wards Trample & Tackle), and in zone 5 Asura (for tech sparking) & Gryphon (drop Avi's Feather).
Upon 'meeting' the 'Young Boy', we are shown the abduction of his younger self from Rashkuta (we know that Rukh's brother had taken him in) by monsters that his immaterial wishful older self double decides to stop (but how would he have been able to? good question.. even Sarah Connor would be lost).
Wanderlust could simply have pointed out the paradox. Battle it is: equip the Trample Ward and preferably techs that do not activate counters, use a vertical formation (like Tiger's Ferocity) to avoid being skewered by Lightning Pierce, and defeat the beast to receive the Expert Ring (STR+5 & tech raw SP cost/2 - cf. this Note on TP cost calculation).


・Floor 4: The Young Boy's Guilt & the Second Nightmare
Enemies:
1) Aquatic (Heptopus x2, Sea Hare, Hydroflower / Despiser, Sandbiter, Venomous Crab), Fish (Sea Mongrel x2, Barbarricuda, Daefish / Petrified Fish, Venomarlin x2, Sullied Lancer).
2) Aquatic (Arch Swoopers, Mobelwagen, Peg Powler / Zera Beetle x2, Genryu), Fish (Nixie x2, Hammerhead / Scyther, Triton).
3) Amphibian (Scalpodon, Wrapper, Rana Warrior x2 / Croaker x2, Raptor x2), Serpent (Serpentfang x2, Geo Python x2 / Venomous Snake x2, Meldworm x2).
4) Amphibian (Gurangatch x2, Draconian / Croaker x2, Raptor x2), Serpent (Venomous Snake x2, Meldworm x2 / Quetzalcoatl x2, Cihuacoatl x2).
5) Amphibian (Rana Soldier, Basilisk, Rana Mage x2 / Lizardman, Lizardman Lord), Serpent (Medusa x2, Crawler x2 / Pythos x2).
You might want to have a go at the following enemies: in zone 2 Zera Beetle (drop Aqua Claw & Mirror Shield) and Genryu (drop Mirror Shield), in zone 3 & 4 Meldworm (to learn the Ward Shivers vs. Earthquake) and in zone 5, Pythos (drop Hydra Leather). You could also go sightseeing Triton, arguably the enemy the most difficult to find in the original SFC version, here for all to see in zone 2.


At the end is the Young Boy's corporeal wish again and we see another, earlier (dreamed?) bit of his life, as an infant taken in (?) by a couple who runs from monsters, which older Young Boy chooses to face...
A wish to change the end of a dream? No can do: Zahhak attacks. Equip with Sonic-immune items (e.g. Soryu Armor, Silver Mail or Armor), your female characters with Mind-immune items (e.g. Matriarch's Helm, Undead stuff), and possibly have some Genbu user with Libation (or just ignore Poison and have double HP regen active). At that point your have already defeated all 4 Abyss Lords anyway, and can possibly wipe this thing in a few turns. After defeating it, you get a Deathshard (to craft an item in the Workshop).

・The Furthest Point: Yama
The last section is as short as the first one. The last portal is guarded by Yama.
Originally designed to be the strongest regular Skeleton mob enemy – a lighter version of Yami – it is now almost on par with the Destroyer/Oblivion.
Still, note the New Special BGM!
Equip the adequate Wards (Net, Bonecrusher, Tackle, Trample) and preferably items with high magic defense (ideally strong vs. Status too), some Rubber Soles (and/or Stardust) and good shields (including Magic Shields), and at least 1 character resistant (or immune) to Fire at front. Shadow Servant will stay with you until the battle is over (or until your character dies, haha). The only very troublesome combination (if you have low HP) is Mega Suction x2; Silence-inducing Corpse Moss can be very disturbing too. 300HP+ would usually be needed (even though it can be defeated with initial stats with Invisible status), in detail here.


Defeat it to release our favorite settlers' memories of the fateful day of the Death Eclipse, which was the cause of Julian's baby sister's death. Have Sarah, Ellen, Julian, Thomas in your party to get the full commented edition. At the end of the novel, you get an anticlimactic Master Ring, that supposedly makes tech mastering easier.


And the last portal brings you back to the start. That's all, folks! Time to head East!
TO HUANG CITY: MARCH & SNEAK (XUAN CITY, HUANG CITY)


Go to Bai Meiling/Bai Meiniang in Xuan City: you explain yourself and she tells you that the Prime Minister Tao/Tsao Gao has most likely succumbed to the Abyss for personal gain and that the last Gate is verisimilarly in Huang City. A council is held with Yan/Yang Fan, who receives news from his superior Yan/Yang Yuchun that confirms Bai Meiling's suppositions. The plan is now to lure Huang City's army in a battle to give you time to sneak in the Capital. (It is not obvious but Huang City is open at this point and if you go there before talking to Yan Fan again, you can witness Huang's defenses before the 'Pretense' Mass Combat empties the city.)
Note / ALT 1: If Bai Meiling is in your party, go to Yang Fan (alternative dialogue, yay).
Note / ALT 2: There are extra scenes and different dialogues if you have reached the East for the first time after closing the 4 Abyss Gates. And you can actually understand why Yan Fan forms such a diversion plan.


Note (Remaster only): In order to maximize the effect of non-party character growth (completely OP in the Remaster due to NG+, allowing you to max out some stats) now is the time to kick everyone out and re-recruit ALL the other characters, before assembling the party of five that you wish to head into the Abyss with.
Talk to Yan Fan again to start the last phase of the game.
You can recruit Yan Fan (in which case his substitute Hianyu will lead the battle in his stead) if you wish (party of 5 or fewer).
Get ready (for the coming Red Dragon Ruler battle) and leave Xuan for Huang (once you enter the Castle, you can never go back).
Note; Actually you can leave the Huang Castle by exiting to the World Map when you are on the Castle balcony! and do the Pretense Mass Combat again, haha.

Entering the Castle (from either side) triggers the Mass Combat army battle!


Yan Fan or Hianyu (2500, Atk or Def Wave) vs Yan Youchun (4000, Def Wave):
The goal is to buy as much time as you can (hold 5h and it is deemed a success; max time is 20h, at which point both sides retreat). If you do not press forward at all, your opponent will smell a trap and retreat. It is easy to reach 20h with Yan Fan's Intels (defend, switch rows, when your opponent retreats let some flee and use one Intel, repeat). Winning, losing, stalling... it changes nothing at all (note that in the Remaster Edition a better time removes some enemies from Huang Castle, which is not necessarily a good thing): while the army was distracted, you have bumped into...


...the Red Dragon Ruler / Dragon Lord! Attacks like Flame/Blaze (hit-all Fire) or Tail Sweep/Swipe (choose formation accordingly) can hurt. It also likes casting Self Burning/Immolation. Be sure to equip Fire-resistant equipment, decent shields, and/or have a healer handy. At this point it shouldn't be too difficult.
It is not exactly crowded in Huang Castle. All enemies are stationary.
Most doors here are one-way (except the few dead-ends). Be sure not to forget anything (not that it matters much at this point anyway).
Loot: Life Cane/Staff of Vivacity, War God/Bujin Armor, Power/Divine Boots, Duel Master/Duelmaster, Gold Dragon/Koryu Armor, Barrier Stone.
One floor up, West, is a Fairy (Lilith & refillable Barbarians) guarding a Life Cane/Staff of Vivacity and a Barrier Stone.
Shortly after, rather easy enemies in a row: Plant (Nite Flower/Nightflower), Serpent (Medusa, 2x Basilisks) and Skeleton (5x Sword God/Bladewraith).


Upstairs, Insect (Mantis God/Mantid) and Demon (War & Strong Demons /Juggernaut & Colossus, who can do X-Attack & Dbl/Dual Impact) keep watch over War God/Bujin Armor and Power/Divine Boots.
In the next room, a Ghost (Ren Wang/Nioh, Kuan Yin/Avalokite, Ming Wang/Vidyaraja) stands in front of the Duel Master gauntlet & Gold Dragon/Koryu Armor, a nice stat-boosting piece of body armor.


Atop the stairs, an Undead (3x Green Dragon Zombie - do not underestimate those).
After a short stroll on the roof, a Beast (2x Cerberus), another high-perched stroll and...
!! Was that Shonen/Young Boy and some suspicious Ojisan that just ran away??
Note: If Shonen is in your party he obviously cannot be doing things elsewhere, so the Ojisan just swears out loud as he runs away.


It was. Yet another little man gone gravy for greed. And he thinks he can harness the power of the Abyss. Foolish human.
In the pale moonlight, Abyss Naga (Abyssal Naga) attacks with plenty of Status attacks that will Poison, Petrify, Hypnotize, Paralyse or Insta-Kill you, some hit-all Supersonic and Tail Sweep/Swipe, and LP-draining Life Steal. Etc. This battle can be difficult if you have not prepared the adequate equipment & Evade skills. It takes Tao Gao with it in its demise, in a short but very funny scene.
Sho-'A Boy'-Nen is now free (if you have a party of 6, you have to ditch one of your faithful sidekicks for this suspicious person you barely know and who has been so rude every time you have tried to start a conversation)(hehe): he transforms the Last Gate so that you can all enter the Abyss.


INTO THE ABYSS AND BEYOND
The Final Abyss is quite a dreary-looking place: no wonder its inhabitants want to go elsewhere.
Obviously not a reason to wreck someone else's world, though.

The spot where you arrived at can heal you completely if you wish. Come back here inbetween your fights with the Lords of the Abyss.


Move forward and you reach a space with 5 teleporters.
The last destination is in the middle (non-definitive, you can have a peek), and from left to right (non-definitive entry also) they lead to Byunei/Buné, Aunas/Aunus, Forneus & Arakes/Alloces. It is possible to fight the Destroyer/Oblivion now but it would have all the forms/powers of the Abyss Lords (and half of their HP) at its disposal too. The other way to do this is to defeat each Abyss Lord in turn, and in time get to a weaker Destroyer/Oblivion.
Beyond each teleporter lies a short dungeon at the end of which is found an Abyss Lord, all powered-up.
Note that these (very) short dungeons are most probably there for you to level up and learn new techs if you are having trouble against the Devil Lords/Sinistrals or the Last Boss, since you cannot get out of the Abyss anymore.
Let's go find Byunei/Buné first.
Enemies: Winged, Amphibian, Plant, Beastman.


Byunei (Buné) in her true form puts up a fight. Super speed (1P), Trinity Blaster, Siren & Earthlizer (All) can hurt in the long term if you don't heal properly. Stare/Gaze (Charmed), on the other hand, can hurt in the very short term, haha. You can take advantage of the Wind environment (Dancing Leaves).
Next is Aunas/Aunus' turn.
Enemies: Spirit, Beast, Demon, Skeleton.


Aunas (Aunus) is at it with his Fire Wall, Flame, Heat Wave, Air Slash, etc. As always, but especially here, careful with your equipment (fire resistance..) and formation (Speculation localizes the damage from Fire Wall to only 1 character).
Remember to equip techs that don't activate Aunas' Fire Counter.
Forneus is next.
Enemies: Serpent, Inorganic, Aquatic, Fish.


Forneus may be the toughest: his Maelstrom (All, Insta-Death chance), Mad Thunder (3P), Great Wheel (All, the Spear tech) & Mighty Cyclon (1P, Throw) can make your life difficult (he will even attempt to Charm your whole party, which can be disastrous). Equip items with Water / Death immunity (Sea Tortoise/Genbu Armor, Devil King/Archfiend Armor, Water Claw.. / the Gold Dragon/Koryu Armor you got in Huang City, or just everyone with a Royal Ring), equip Evade Skills (Blade Roll/Rolling Slash..), take advantage of the Water environment (Water Ball/Column), set up Illusion Sun/Parhelion (for who can) and Reviver. And the usual offensive: Tiger Break, Split Body/Doppelslasher, Golden Dragon, Yoyo, Orbit Borer, Round Slicer, Final Letter, Meteor Thrust, Continuous Shot...
Note that Forneus has here the highest FlashLV so far (36) so if you still have techs to learn, now is the time.
Next and last of the Abyss Lords is Arakes/Alloces.
Enemies: Spider, Undead, Fairy, Ghost.


Arakes (Alloces) is a combat master and he attacks you (in addition to his Big Rotation, Rear Burn & al.) with various techs using various weapons (even though he is only equipped with a Lucerne and a Silver Sword): Sword (Thousand Bird), Epee (Screwdriver, 800+ dmg to female characters), Mace (Earthquake Hit), Spear (Dragon Hit), Kungfu (Strong Strike, 600+ dmg Super Strike, Body Drop)... As usual, Water Ball/Column or Dancing Leaves can come in handy (in addition to stopping Arakes' HP regeneration). See the dedicated Bosses section for useful Evade Skills to equip. Keep yourself healed and it shouldn't be too hard. All in all, given a significant part of his arsenal is limited to physical attacks (more easily blockable, with magic shields for example, or counters even), maybe the easiest of all 4.
Once the 4 Abyss Lords are defeated (and our next and last enemy weakened proportionally), heal and head to the central portal.
Why, if this isn't Sarah!


She is joined by Young Boy Shonen and tells us that now that the two Destined Children are together, the power generated is too great, all is lost, both the world and the Abyss will be destroyed by this power that is about to take shape as the Destroyer/Oblivion (how knowledgeable she is, it would have been nice if she had told us all of this at the beginning of the adventure). Your main character suggests that Sara and Shonen should try a little bit harder and repurpose this power into something more positive and lively. Meanwhile, we should take care of this Oblivious Destroyer.
You are given another chance to get ready (careful, Shonen just left the party, so your formation has reset to Free Fight). When you have finished postponing the inevitable, let's meet this thing.


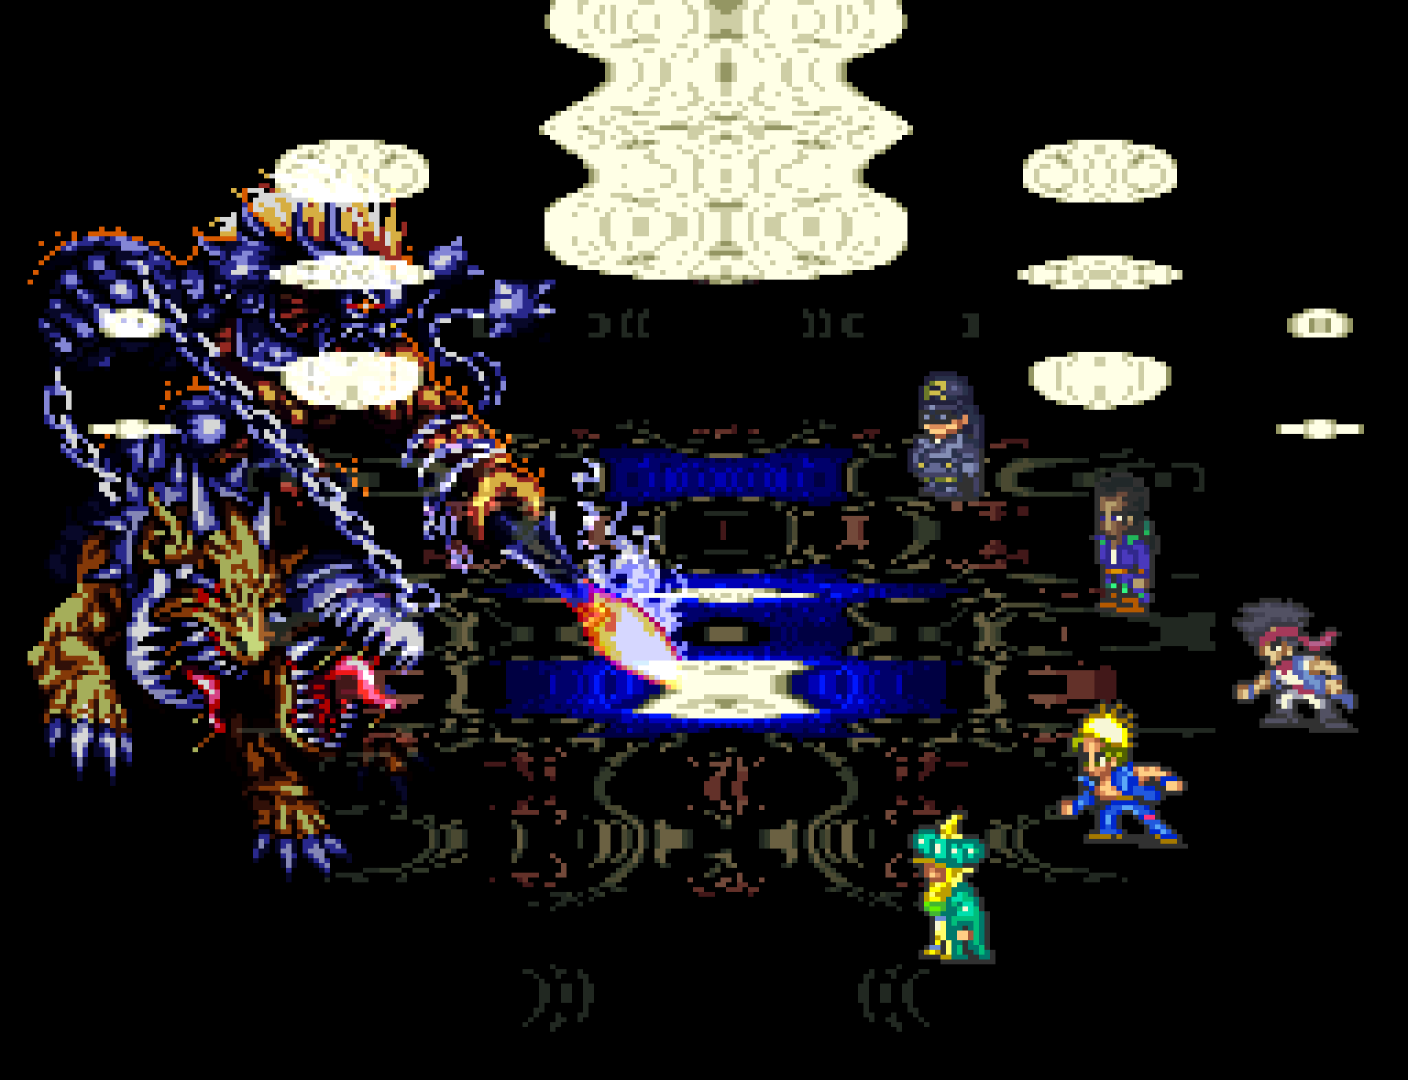
Wow, the final battle is lavishly brought and done.


The Destroyer (Oblivion) has 10 forms in all.
4 forms are the Light Wing form (the regular form). They all look the same.
2 forms are the Dark/Void Wing forms. There is a strong version and a weaker version.
Light & Dark Wing forms have a total of 75k HP.
4 forms are the Beast/Demonic Wing forms, those of the Abyss Lords (60k HP in total), which won't activate if you have defeated them previously.
The Destroyer/Oblivion's stats go up with each form (see the Boss Page or the Enemy List). When it changes forms (which may go unnoticed visually), there is a reset (like for Byunei/Buné, for example), so it is not exceedingly efficient to focus on (de)buffs at the start. When changing from Light to Dark, your magic shields go poof. The last change (forced Dark/Void Wing form) occurs when its HP go below 15k: technically, its HP is nulled and 15 or 40k HP are added.
In fact, your best friends may just mainly be Tiger Break (character STR VIT up), Doppelslasher, etc. and whatever means of healing at your disposal (magic ofc, but also Nightingale & Life Canes/Staves of Vivacity, or even Salves/Balms if you are that kind of person). You may want to equip some Evade Skills (mainly Stare/Gaze & Death Sickle/Reaper's Scythe). See also Note 3 below.


1) If you have defeated the 4 Abyss Lords, it is a lot easier and the only visual change is when the Total Eclipse occurs: the Destroyer/Oblivion changes in its Dark/Void Wing form.
That said, its only really troublesome techs are those inducing Charmed (or Charmed-like) status, because one charmed character may effectively annihilate your own party in one turn (hence the Evade Skills recommendation). Such are Nightmare (Sleep + Berserk, Charmed or Silence) and Teasing Whisper (1P, Charmed). Likewise, Fatal Mirror retargets your attacks (to the affected character, ofc)(who will also hit him/herself if applicable). Death Stove may, as usual, Insta-Kill 1P. Howling will raise and manipulate one dead character to make it attack (this is really cool, and attacks by a Howled character cannot be avoided with Invisibility). Ming Wang Punch is a 1P, Hit-attribute, stat down (INT WIL CHA -5), anti-Undead attack (ouch Leonid). Other techs are pretty neat-looking (Abyss Wind) and can hurt if you have low HP. When you have dealt over 60k dmg, the Destroyer transforms into his last Dark Wing form, Sara+Shonen speak (urging you to hurry): it does not revert back to the Light Wing form anymore, and you may well end it in one turn (only 15k HP left)!


2) If you have let the Abyss Lords live:
- The Destroyer/Oblivion in its Light Forms 1-2 can change in a Beast's/Demonic Wing form which, each time, borrows the powers of one Devil Lord/Sinistral. These forms have separate, specific HP. When that specific form runs out of HP, it transforms back to the Light Wing form. This means that you may not see any of these forms if you hit really hard (it may change directly in its Dark Wing form).


- In its Light Forms 3-4, it can transform into the Dark/Void Wing. You can make it revert to its Light Wing form by using Sun or Moon magic (25% chance?) and everyone will be partially healed (HP gain=[Sara's HP+Shonen's HP]/4) and resurrected in the process, which is quite nice.


- When the last, strong Dark/Void Wing form occurs (over 60k dmg), its HP is reset to 0 and 40k are added. It is much tougher and has additional techs (from the Devils Lords/Sinistrals: Maelstrom, Firewall, Earthlizer, Supersonic.. - do not forget to equip the corresponding Evade Skills if you have them: Blade Roll, Aiming, Bone Crush, Net, Thousand Bird). But this is also much more fun, IMHO. Good luck!
Note 1: If you lose against the last Dark/Void Wing form, you can see the 'bad' ending, where the Destroyer annihilates the universe. (In the Remaster edition, it is just flames engulfing the battle screen.) And back to title screen.
Note 2: It is possible to defeat the Destroyer when it is still in its original Light Form: do slightly less than 60k dmg (you need to count precisely) as fast as you can, and do the necessary dmg to go over 75k during the next turn (the battle will cease as soon as you reach 75k dmg).


Note 3: There are plenty of ways to defeat the Destroyer. There are few indications to defeat bosses in this Walkthrough (but there is a specific Boss Page) because those battles are the only place your understanding of the game (formations, equipment, techs, spells), personality and inventiveness can come out and shine (as most other battles are over in a couple of turns). But many people seem lost (mainly people rushing through the game for achievements on the Remaster and finding themselves a bit short at endgame)(or YouTubers who get angry at people who dare not tell them how to dispatch Oblivion quickly, haha): if you want to do it the easy way, just put your party in Phoenix Dance formation, with some high-LP character (ideally Zo/Rukh) in spot 1 (center) with a good shield (Will Guard, Water Mirror Shield), cast Dragon God Descent and keep up a Shadow Servant (or cast Illusion Sun), and attack with Tiger Break with eveyone else (or Split Body/Doppelslasher if your Martial LV is low, or any good tech you have). You can even put Dragon God and Shadow Servant on the rest too for additional damage if your characters' LP allow it. See Note 2 above to make things even easier. Commander Mode can be quite OP too. That's about it! If you want to have a detailed look at the Destroyer/Oblivion, see the Boss page.
Note 4 (Remaster Only): During Oblivion's last Void form, its HP and atk pwr will keep going up (bug or feature? it seems consistent with Sarah & Shonen's warning, that 'The Abyss is getting stronger'): hurry up and kill it! ; P
ALT: SARA'S SPECIAL
If your main character is Sara/Sarah, be careful: there is no 'Let's check our equipment & formation' phase: be ready to fight the Destroyer/Oblivion before you enter the last (Aurora-like) door. The dialogue of your reunion with Shonen/Young Boy in the Abyss is different, with identical results.


Thus deprived of your main character, the last encounter plays out in a Special Commander Mode.
For more info about Commander Mode, see the dedicated section.
・Unfortunately there is no HP regen at the end of each turn, no status ailment healing, no recovery with 1 HP if you lose 1 LP – which can be tough. And sometimes you won't gain Formation WP.
・Each turn, you can choose your formation (you start in Free Fight and cannot control the characters when changing formations) and the general Mode (if you have been using CM a lot, Fast is recommended, as a high SupportLV guarantees a very high first-strike success rate, which allows you to avoid Fatal Mirror). Speaking of Fatal Mirror, note that even if successful it does not work on characters performing a Ftech (very nice).
・You can control all the characters that are not used in a formation attack (hence, you can control all your characters in Free Fight, Dragon Form or fewer-than-5P formations, for example). You can also control all characters when you use the Backpack (where you should have stored healing items - they really help).
・Sometimes, supposedly (I have not been able to yet), you can use a special Ftech when The Destroyer is in forms 3-4: Light Wing (compatible only with Free Fight, Whirlwind, Phoenix Dance, Genbu, Power Raise, Tiger's Den & Desert Lance), that cancels out Dark/Void Wing and triggers HP regen at the end of the turn. (Rather than waiting for this to occur, use Sun/Moon spells to dispell F3-4 Dark Wing.)
・There are also a number of additional specificities, like the facts that Counter techs do not work (except Ftechs), that if a character with Reviver participating in a Ftech dies and is Revived before the Ftech, the Ftech occurs as usual, that Quick Time's only effect is the Stun upon casting..
Notes:
- If your level is low (4-500 HP), have no magic and/or have fewer than 5 characters, good defense items & Evade Skills are capital (at least Stare/Gaze, Death Sickle/Reaper's Scythe, or alternatively a Royal Ring for each party member), and in the Dark/Void Wing form there is a Deathgod Stove / Howling pattern that cannot hurt you if you have kept everyone healed correctly (Kungfu's Focus, Life Cane/Staff of Vivacity, Nightingale, Salve/Balm).
- If you fight the full Destroyer/Oblivion, Tiger's Den/Ferocity's Phys Evade can be very useful vs. Beast's Wing Arakes Form.
- For more info about the Last Boss, see the dedicated Boss Page: Oblivion (scroll down for strategies and tactics).
Good luck again!
And eventually...


ENDING (THE NEW WORLD)
... It is, quite literally, the end of the World: the Destroyer is defeated but it seems that the destructive energy born from the presence of the two Destined Children together in the Abyss is uncontrollable and wipes out everything in the universe, and that Sara and the Young Boy have failed... or have they really?


Congratulations for completing the game!
If you've been this far, it surely means that you've enjoyed it. I know I have.
On the top of the generic ending and credits roll, there are also scores of individual endings, triggered by the quests you have completed, the decisions you have made, or the people you have met, recruited, kept with you till the end. Here they are.