
WALKTHROUGH PT. 2
QUESTS:
Notes:
- Sealing one Abyss gate opens a variety of quests (Fire being possibly the easiest and the shortest, and you can learn Reviver).
- For your enjoyment's sake it might be better to do the short quests after sealing your first Gate.
- For the same purpose, it might also be opportune not to fight too many enemies on purpose (grinding): your party really becomes too powerful and meets no resistance from fixed enemies.
- You can also check this alternative quest completion order depending on fixed enemies' Up/SparkLV.
・FIRE ABYSS GATE (FIRE PALACE/FIRE FORTRESS)
・WATER ABYSS GATE
・THE VANGUARD MURDER CASE (VANGUARD)
・THE DOLPHIN STATUE (GREAT ARC/GREAT ARCH, HERMAN'S TREASURE CAVE, VANGUARD)
・FIRE AND WATER OVER A WELL (MOSES/MAHZOZ)
・SAVE THE LOBSTERS (VANGUARD, LIMIT ISLAND/WORLD'S END)
・SEAL THE WATER ABYSS GATE (VANGUARD, UNDERSEA PALACE)
・CHICKEN-RACE THE DRAGON MACHINE (ZWEIG, WEST FOREST)
・ZWEIG TOURNAMENT (ZWEIG)
・HOLY KING / MATRIARCH TRIALS (LANCE, HOLY KING TEMPLE/MATRIARCH MOSAULEUM)
・CHASING MAXIMUS (PIDONA, MAXIMUS' HIDEOUT/BASE, DIVINE TOWER/ARCHLORD TOWER)
・ANCIENT TEMPLE RUINS (ANCIENT TEMPLE RUINS)
・WIND ABYSS GATE (LOOB/LOUV - LOANNE, MOUNT TAFTAN)
FIRE ABYSS GATE (FIRE PALACE/FORTRESS)
If you cannot access the Fire Palace/Fortress from the World Map, it means you have not found it yet, have you now?
Here is where and how.

Chests: Flame Beast/Ignus Leather, Nitingale/Nightingale, Firebird/Shucho Armor, Barrier Stone, Multi-magic Crimson Flare (for Commander Mode), and a total of 4000G. Nice.
Enemies: Skeleton, Beastman, Spirit, Demon. Beastman & Spirit enemies are fixed (Aunas Mage/Aunus's Pixie, Shock/Shocker, Magma/Magmite), which incidentally makes the Fire Palace extremely boring if you leave it for the very-end game (again: fixed enemies are the landmarks from which should be deduced the difficulty of a quest, and hence the quest clearing order: if they are too easy, you are too late, haha).
Thanks to Aunas Mage (Aunus's Pixie), the Fire Fortress is a gold mine (up to about 50G per Mage/Pixie, and sometimes you get to battle 5 together). Speaking of gold, Aunas Mage can drop Sands of Mars/Celestial Dust, and Magma Spirit/Faerie Stone, both of which can be sold decently (for respectively 125 and 250G).
You also meet Triomagen (Magic Trio), a trio of funny-looking, round-shaped, Beastman wizards who do nothing and are defended by an unlimited supply of Fire monsters (Shock/Shocker, Thunder Fire/Pyroclast, Blazer, Elm bird..).


Mini-boss battle: Hidona (Pyrohydra). Hit it hard. It deals triple attacks, physical and elemental attack (fire, water, bolt).
Now is the time to get ready for what is to come: wear whatever Fire equipement you have (you got Flamebeast/Ignus Leather and maybe Hidora/Hydra Leather in the Fire Palace) (Firebird/Shucho Armor has the major drawback of granting the Flying status, against which Aunas' Gale Sword crits). Drink some potions and off we go.
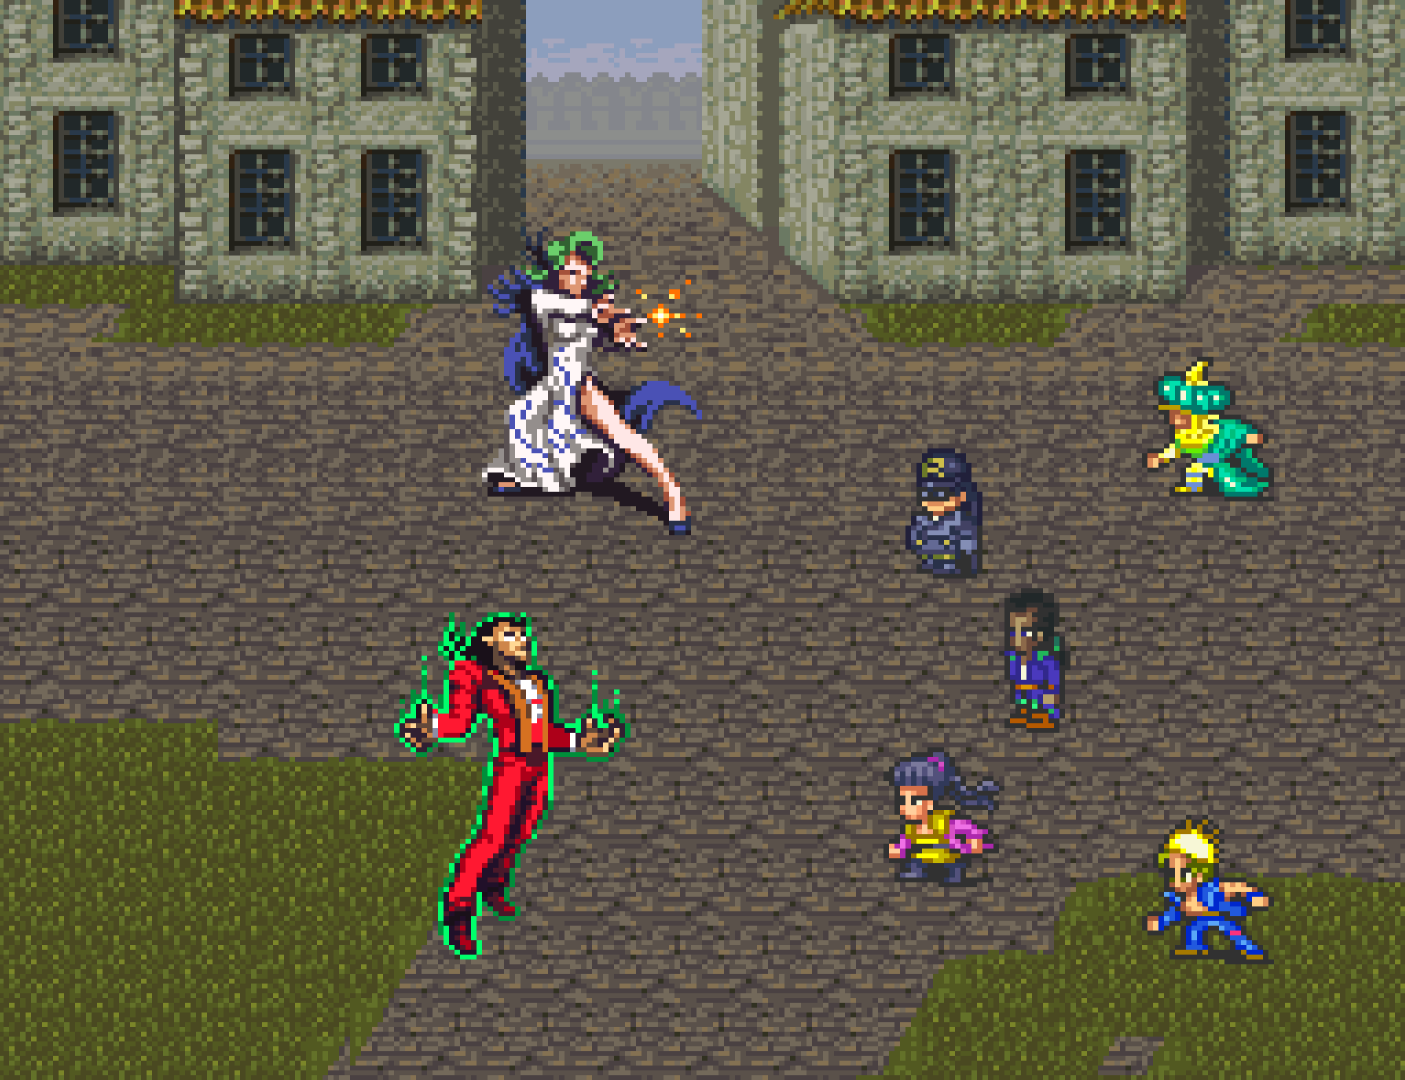
Aunas (Aunus) hits twice per turn with hit-all Heat waza (Fire Wall, Heat Wave, Flame), Sword techs (Gale Sword, Dragon Tail, Super Sonic), Insanity (status attack, may Confuse, Charm or Silence) and Deathgod Stove/Reaper's Scythe that insta-kills one character (but at the same time you may learn the corresponding, very useful Evade skill, Death Sickle). He also has a dangerous Fire Counter (a permanent Self-Burning from his Fire/Flame Mantle): don't forget to unequip Silver Hand/Glove, and preferably use ranged techs like Aiming/Aim, Tomahawk, Dragon Hit/Snake Blaster, Double Dragon/Dual Dragons, Instant Power/Pressure Point, S Dimension/Spatial Persona..., and of course any Bow tech or, more curiously, counters. Hit-all techs also work (Holo Sword/Mirage Blade, Great Wheel/Giant Swing, Firecracker...). Full list here. If you use Commander Mode, know that Formation Skills (Ftechs) also work. And, evidently, magic. You can protect yourself with Self-Burning/-immolation (Fire magic shield, cancelled if hit directly). On the other hand, Aunas is immune to Fire, Status & Sonic (like Aerobit). Some Evade Skills you can equip if you have them, or learn if not (check the detail in the Bosses section). Drop: Fire/Flame Mantle.


Reminder: If some of your characters run out of LP during an Abyss Lord battle, they come back to life and are restored to full after you win (except Snowman in the following case:).
ALT: If Snowman (Re: Flurry) is in your party and all other members are down (and if the Fire Abyss Gate is not your 4th Gate), he uses his Eternal Ice/Everfrost Crystal to activate the special tech 'Forever Ice!' to kill Aunas, sacrificing himself in the process. Fire/Flame Mantle does not drop in this case. When closing the Gate, your main character does not rejoice but grieves the loss of their snowy friend. In your inventory, you will find that Eternal Ice has reverted to its usable item form.


After defeating Aunas, you can still go inside the Fire Palace. It seems deserted but it's just the main rooms: all the lateral rooms (where the treasures used to be) are full of the same monsters. Cerberos (for some extra Flame Beast/Ignus Leather for the Workshop?) has respawned too. Unfortunately, the Hidona/Pyrohydra is gone. You can't enter the Abyss Gate room either. Oh well, one down anyway.
Don't forget to learn the strongest Fire spell (Reviver, very useful) from Anna in Lance if you want.
WATER ABYSS GATE (VANGUARD, GREAT ARC, HERMAN'S TREASURE CAVE, MOSES, LIMIT ISLAND, SEA PALACE)
This quest is not short, but you can complete its parts inbetween other quests (contrarily to the Eastern Quest).
It entails 5 sub-quests:
- The Vanguard Murder Case (Vanguard)
- The Dolphin statue (Great Arc/Arch, Herman's Treasure Cave, Vanguard)
- Fire & Water over a Well (Moses/Mahzoz)
- Save the Lobsters (Vanguard, Limit Island/World's End)
- Seal the Water Abyss Gate (Vanguard, Undersea Palace)
Important Note: Once Vanguard moves, you won't be able to open the Small Village/Tinyville on the World Map: do it now or never.
THE VANGUARD MURDER CASE (VANGUARD)
After you have heard about the Abyss Gates from Anna and her brother in Lance (top-right house), when you enter Vanguard you watch a cutscene in which a happy couple (the one that used to spend their days in bed) is brutally murdered by one of Forneus's Soldiers.
If you talk to the Mayor, he asks you to come to him if you learn something new. Sleep at the Inn in Vanguard: after a funny scene you will be attacked by Forne/Forneus's Soldier x3, to be dispatched.
Talk to the Mayor: this is the main goal of this arc: we must make Vanguard move again, like in the old times (cf. Poet's Vanguard old song for details). Tell the Mayor you will help (for free, or for 3000G or 5000G, up to you, careful with your Greed Counter if you are Harid/Khalid). First things first: find Vanguard's inner part. Leave the room, come back, talk to the Mayor, who opens a secret trap door that leads to the basement.


Vanguard (Inner): we are in Vanguard's belly.
Enemies: Insect, Inorganic, Serpent.
Includes a mini-maze with some prrrretty obvious traps (hallway: the 3rd door has chests).
All in all, not much to loot (Fang Charm/Amulet, Horned Cap, Life Elemnt/Root of Life, Mpotion 2/Spirit Liquor, 600G).
You can possibly go straight to the Control Room and grab the chests on your way back, when the monsters have disappeared.
Cold/Frost Spirit x4 can be difficult early on (hit-all with a fast character, or tech vs. Undead, ideally Exorcist/Exorcising Slash).
Power up the Control Room and head back to the Mayor: he asks you if the Control Room looks like the picture he shows you. It does not matter what you reply: it will only switch the order of the two next sub-quests: in order to make Vanguard move, we need Water mages and the Dolphin Figurine.


THE DOLPHIN STATUE/FIGURINE (GREAT ARC/GREAT ARCH, HERMAN'S TREASURE CAVE, VANGUARD)
If you noticed that the Dolphin Statue/Figurine was missing in the Control Room, you are sent to find it first and here you are.
If you did not notice those few different pixels in the photo the Mayor showed you, Vanguard fails to activate even with the Water mages: something is missing! If you talk to the Mayor again (you do not have to go all the way to the Control Room and observe that Vanguard does not power up before talking to the Mayor), he tells you he found in another old book that the statue is necessary. All right, let's get it.
Note: It is possible to get the statue much earlier, by clearing Herman's Treasure Cave on your own (i.e. without Herman). If you did that, the Mayor will simply ask you to put the statue in place in the Control Room.


Hint 1: Someone in town knows something.
Gossip-talk to the barman (who, we know, hates dolphins) thrice:
Hint 2: The barman tells you he sold it to the Dophore firm in Yamas/Yarmouth.


Head to Yamas/Yarmouth and talk to the seller in the item shop by the town square: Buy something and I'll talk, he says.
Hint 3: The seller tells you that the Dolphin Statue was stolen by Black.
We know Black's treasure is all the hype in Great Arc/Arch: let's go there and ask Herman, lost in thoughts on the pier.
He acts differently when you mention fighting Forneus (fire in his eyes! there's some backstory here!): take him along with you.


The Dolphin Statue is in the lowest depths of Herman's Treasure Cave (click for the complete map & walkthrough), protected by a rather easy fixed trio of enemies (meaning it is possible to come here very early in the game): Kanherdraco/Quetzalcoatl, Psn Leech/Venom Lich and Croaker. And after grabbing the statue you can go straight to the surface thanks to the exit on the right.
Now:
- If you have not got the Water mages yet, the Mayor will tell you to see what's up in Moses/Mahzoz, in the next section. Note that if Undine is already in your party, she will speak up and say she will take care of everything: you have nothing else to do and can go back to the Control Room (skip the next section).
- If you already have the mages, off we go!


FIRE AND WATER OVER A WELL (MOSES/MAHZOZ)
There are four ways to do this. Undine is in North Moses/Mahzoz; Volcano is in South Moses/Mahzoz; they both want something in the Well. In any case, the first time you enter either house (or every time if you refuse the request of either one and have not accepted the other's), you have to fight some of their disciples (Bronze Mag/Magus in Undine's, tougher Cryptmagi/Crypt Magus in Volcano's). After that it's up to you:
1) You can accept Volcano's request, and refuse Undine's: you go after Undine, fight some Bronze & Silver Magi/Magus, loot the house on your way, confront Undine who fights in Commander Mode (or rather, she runs away, as might suggest the locked exit door, never to be seen again) with 3 Gold Magi/Magus (careful, they can use the Ftechs Cat and Dog, Star Virus, Zodiac Fall). After you defeat them, go see Volcano: he tells you he has taken the item in the Well, and gives you the rest of the reward. Talk to him again to get him to help you with Vanguard. He can now teach you Fire magic if you wish (a recruit option would have been great but oh well).
All in all: 8000G, Witch's Eye, Lake/Lagoon Robe (and possibly some Mpotion 1 or 2 / Puissance or Spirit Liquor dropped by the Magi/Magus enemies).


2) You can accept Undine's request, and refuse Volcano's: follow Volcano to his study, fight Cryptmagi and open his chests on the way, fight Volcano. Go back to Undine to learn she got what was in the Well and to get the rest of your reward. Talk to her again to get her to help you and send Water mages to Vanguard. You can now recruit her or learn Water magic from her.
All in all: 7000G (and more from the Cryptmagi), Flame Beast/Ignus Leather, Guard Ring/Ring of Fending, Witch's Eye, Lake/Lagoon Robe, can recruit Undine.
Note 1: Undine and Volcano are not immune to the Insta Death or Petrify attributes, so if you are struggling you now know what to do..
Note 2: In these first two scenarii, you never get to know what was in the Well! Is that not bugging you?


3) You can accept both Undine's and Volcano's requests and double-cross them by being curious about the source of the feud: the thing at the bottom the Dead Man's Well. Talk to the bartender in South Moses/Mahzoz to learn about the Well, then talk the mages of both factions before the Well to make them step aside: you can now take a peek inside the Well. 'So, what's in this well?'
Note: At this point you may have changed your mind and got an urge to kill Volcano or Undine! and fortunately can still follow route 1) or 2) by visiting the magician you want to kill. Also note that you needn't start the quest to move Vanguard to settle the situation in Moses/Mahzoz. If you quelled the feud early, once you are looking for Water magicians to power Vanguard, just go back and talk to whoever is left or whomever you wish to get help from. On the other hand, Undine and Volcano won't help you with the Water mages until you settle things between them.


The Dead Man's Well is a mini-dungeon.
Enemies: Undead, Skeleton, Ghost.
Little loot: Bloody/Sanguinator, Mpotion 2/Spirit Liquor, Spirit/Faerie Stone, 300G.
At the end of the (slightly hidden) path, the Death Master, who calls upon endless Undead minions, and drops an item.
So, what was at the bottom of the well? the Devil King Shield/Archfiend's Shield, a nice relic from the good ol'days.
(See this Note about the peculiarities of the DKS.)


Retrace your steps and get out of the well now. My my, a surprise party:
Volcano & Undine are not happy that you have deceived them: they team up against you.
Volcano puts up Fire Walls and Undine's Water Ball/Column can be annoyingly efficient. Defeat them and scold them appropriately.


You can now go visit one or the other to have Water magicians sent to Vanguard.
Now also you can loot Volcano's house for Flame Beast/Ignus Leather and Guard Ring/Ring of Fending. And get Witch's Eye and Lake/Lagoon Robe from Undine's if you have not done so already. And recruit Undine if you wish.
All in all: 4300G, Flame Beast/Ignus Leather, Guard Ring/Ring of Fending, Witch's Eye, Lake/Lagoon Robe, Bloody/Sanguinator, Mpotion 2/Spirit Liquor, Spirit/Faerie Stone, Devil King Shield/Archfiend's Shield, can recruit Undine.
4) There is actually a last possible way to do this: accept both Undine's and Volcano's offers and go defeat them at once separately (go find one then the other in their respective study and fight Volcano on one hand, Gold Magi/Gold Magus x3 on the other). You can now freely go get the Devil King Shield/Archfiend's Shield in the Dead Man's Well. To power up Vanguard, talk to Undine's depressed disciple at the Inn (North Moses/Mahzoz).


All in all: same as scenario 3 (Devil King/Archfiend's Shield, 4300G, Flame Beast/Ignus Leather, Guard Ring/Ring of Fending, Witch's Eye, Lake/Lagoon Robe, Bloody/Sanguinator, Mpotion 2/Spirit Liquor, Spirit/Faerie Stone) but Undine and Volcano are lost.
Anyway! now that we have the Water mages for Vanguard,
- if you have not found the Dolphin Statue, Vanguard's Mayor will have found another old book saying that the statue is needed. See above.
- If you have got it already, off we go!
SAVE THE LOBSTERS (VANGUARD, LIMIT ISLAND/WORLD'S END)
Now that you have the Dolphin Statue/Figurine and the Water mages, we can turn Vanguard into the mobile fortress it used to be! One of the most exciting moments of the game indeed. Talk to the Mayor, go one last time to the Control Room through the trap door, place the Statue against the window (if you hadn't already) and climb onto the small platform to start the launch sequence. Off she goes, bye bye land.


Have a look around to see what you've done with the place, go to the Control Room and order to head, as Herman suggested if he was with you, to Limit Island/World's End. Upon arrival, get to the docks (Vanguard map here if needed) to board a ship to Limit Island/World's End.


Limit Island (World's End) is full of giant humanoid lobsters! Awesome.
Talk around to learn the location of the Undersea Palace, and that the island is about to be destroyed by a dragon sent forth by Forneus.
You may, of course, head straight to the Palace now.
But then again saving the island is also an option (otherwise it disappears and you can never meet those friendly crustaceans again).
To help the lobsters (there is something in it for you too, don't worry), go down in the cave (upper-left).


Limit Island/World's End Cave:

Enemies: Fish, Aquatic.
Loot: Magic Beast/Morax Leather, Barrier Stone, Spike/Spiked Shield, Life Elemnt/Root of Life, Fang Charm/Amulet.
A couple of rooms into the cave, behind the very large waterfall is a hidden exit leading to the Water Dragon (the one you must defeat to save the Lobsters).


At the end of the cave, behind the small waterfall, is a room with one Aquatic enemy (the real treat of this cave) amidst other Fish enemies: Mys Dragon (Genryu), very tough (ouch that Counter), against which you can spark techs aplenty (FlashLV 32) and gain skill levels like mad (UpLV 34), and that also rare-drops the Water Mirror shield. If you are 'fishing' for the shield, you might be glad to know Mys Dragon/Genryu is susceptible to Insta-Death and that Leonid's Gentle Touch, when successful, does not prevent an item drop. If Mys Dragon does not appear, fight some more Aquatic enemies to raise your MonsterLV.
When you are done, go back to the surface, get Boston if you wish, some Water magic possibly also?, and let's go kick Forneus' ass.
SEAL THE WATER ABYSS GATE (VANGUARD, SEA/UNDERSEA PALACE)
Go to Vanguard's Control Room and search for the Palace (submarine mode! I hope that all doors are airtight-shut..), deeper and deeper and deeper and deeper, until you find it, and head in.


Undersea Palace at last.
Enemies: Aquatic, Demon, Fish.
Like most dungeons in RS3, pretty straightforward, with lots of different, beautiful backgrounds, only longer!
Whatever your Party Level might be, the enemies will start weak.
Don't miss the Meteo Frag/Meteorite Shard in the hidden room, 4th screen in (rocky terrain, the first path going down).
The whole loot: Sea Tortoise/Genbu Armor, Meteo Frag/Meteorite Shard, 2x Fishscales/Fish Scale, Barrier Stone, 2x Tpotion 2/Strength Salts, 5500G.
And the multi-magic Tempest.

In the depths of the Palace Under the Sea, Forneus will Claw you, Trample you, Ink you, Digest you, Thunderbolt you, Poison-Needle you, Tail-Sweep you, Squall you, Horn you, Face-Hit you, Fang-Crash you, Face-hit you and Maelstrom you! but you should do all right, shouldn't you? Forewarned is forearmed: equip some items which are Water-resistant (Fishscales/Fish Scale being the most common), strong vs. Hit/Blunt (Brigandy/Brigandi & Close/Closed Helm being very accessible) and if possible Insta-Death-immune too (Royal Ring), Maelstrom being by far its most potent (and annoying) attack. Also, the Trample Evade Skill can come in useful. If you do not have magic handy to change the battle environment, some techs can fulfill the same role, like Earth Run or Firecracker (complete list here).


Water Abyss Gate closed!
One of the bonuses being Black, Herman's better (and younger) self, back among us. (Even if Herman is LP-killed during the boss battle, he is revived as Black after Forneus is defeated.) See also this Trivia Note for a doublet!
We can go back to the Continent now.
Don't forget to learn the strongest Water spell (Quick Time/Hasten Time) from Anna in Lance if you wish.
And to kick Poet out and re-recruit him, singing a new song, for ManaSword's quest if need be (SFC ManaSword patch only).


CHICKEN-RACE THE DRAGON MACHINE (ZWEIG, WEST FOREST/WESTOS FOREST)
You have been run over, over and over again, by some wild wheeled machine going way past the speed limit.
But no more, no.


Go to the West Forest (Westos Forest) and make your way to the Professor's House/Hall.
You now have access to the basement: talk to the Professor and cheer her up (if you leave her be, you just can't get rid of the darn car): she lends you a prototype to help destroy her failed experiment.


To get rid of the N./Nacht Zweiger you only have 3 characters aboard your R./Licht Zweiger (members # 1 to 3 in your current formation) and if anyone's HP reaches 0 they fall off the car (tricky!). The Dragon Machine has three parts: N. Zweiger the main body (8k HP), and two cannons (H./Hitze Cannon & N./Nadel Cannon, respectively 10k & 5k HP), and attacks with Poison Mist, Needle, Hot Gas, Body Hit...
When your R. Zweiger has more HP than N. Zweiger, it catches up and can take part in the fight, by offering, in addition to the Engine On command, the option to Body Hit/Tackle it. Go girl.
Hit the H. Cannon enough and it will misfire and self-destruct. Bring the N. Zweiger's HP to 0 and there she goes off the cliff.
If you want you can go back to the Professor's mansion and get rewarded with a hot kiss (again, haha).


Now the machine is scrap! good.
But in case you were wondering about those initials in the names (SFC patch), what they stand for in Japanese, and what they mean:
N. Zweiger = ナハトズィーガー Nahato Ziigaa, German: Nacht Sieger – Champion of Darkness!
R. Zweiger = リヒトズィーガー Rihito Ziiga, German: Licht Sieger – Champion of Light!
N. Cannon = ナーデルカノネ Naaderu Kanone, German: Nadel Kanone – Needle Cannon!
H. Cannon = ヒッツェカノネ Hittsu Kanone, German: Hitze Kanone – Heat Cannon!
I'm glad I took the time to check everything. Now THAT makes a lot more sense to me.
ZWEIG TOURNAMENT (ZWEIG)
While we are in that part of the world (Zweig), we might as well enter the Zweig Tournament.
You have to fight 4 randomly-decided matches against teams with 5 or 6 opponent each. It's one-on-one and you can choose your characters' fighting order (A button; fight with B). You start each new round with fresh HP/TP/MP. There is no penalty if you lose (on the contrary: free Inn effect) and you can challenge the tournament as many times as you want. It can be very easy to complete if you get to fight against weak teams. In any case, First-Strike techs (Bolt Pierce, Satsuki Rain, Quick Arrow), Petrify/Insta-Kill spells & techs (including Golden Bat's Midas Hand) & HP-regen items can be quite useful.
There are 16 teams in total fighting for the prize, including your Saga Team and 'Wall of Hell / Hellwall', Zweig's special armored gang.
This tourney is also the occasion to see special enemies, like Barbarian, Master Dobi (Dobby Don), and rare (weaker) enemies.
There are also some weird teams, like Beetles (4x Beetle & 1x Imp). Okay.
Beside Wall of Hell and Beetles, there are also: Revengers (Undead), Devil Masters (Demon), Abyss Team (Skeleton), Dragons (dragons! with a Red Dragon, the strongest enemy you can face here), Elements (Spirit), 2 sets of Goblins (Beastman), Dinopus (Beast dinosaurs), Water Mages (Water-elemental enemies: Plant, Beast, Spirit, Silver Magi), Marines (Aquatic), The Ladies (Female enemies), Kryptons (Beastman), Hell Rangers (Ghost).
Here is the full list of your possible opponents (Remaster official Team translations between brackets):
| Teams | 1st | 2nd | 3rd | 4th | 5th | 6th |
|---|---|---|---|---|---|---|
| ABYSS TEAM (Team Abyss) | Skeleton | Barisyldra (Balisudra) | Ghost | Rotten Gion (Putrid Gigant) | Ill Head (Eerie Skull) | x |
| BEETLES (The Beetles) | Beetle | Beetle | Beetle | Beetle | Imp | x |
| DEVIL MASTERS | Oannes | Gargoyle | Evil Demon (Evil Ogre) | Demon (Raksha) | Mad Jester | x |
| DINOPUS (Dino Power) | Triceps (Triceratops) | Raptor | Wingdragon (Pterodactyl) | Grangich (Gurangatch) | Barbarian | x |
| DRAGONS (The Dragons) | Blazer | Biter | Wyvern | Red Dragon | Draconian | x |
| ELEMENTS (Elementals) | Whirlwind (Kamaitachi) | Rain (Rayne) | Earth (Terrawarden) | Thunder Fire (Pyroclast) | Aerial (Aeriel) | x |
| GOBLINS (By the Gobs?) | Goblin | Goblin | Ground Wolf (Lobo) | Hobgoblin | Brother (Bruiser) | x |
| GOBLINS (The Goblins?) | Goblin | Goblin | Boarer (Hogrider) | Dobi (Dobby) | Master Dobi (Dobby Don) | x |
| HELL RANGERS | Strange Eye (Lurker) | Evil Spirit | Ghost | Cold Spirit (Frostspit) | Taomaster (Tao Master) | x |
| KRYPTONS (The Cryptons) | Krypton (Crypton) | Crypt Elder (Cryptkeeper) | Krypton (Crypton) | Krypton (Crypton) | Cryptmagi (Crypt Magus) | x |
| MARINES (The Marlins) | Sand Biter (Sandbiter) | Dirty Lance (Sullied Lancer) | Psn Crab (Venomous Crab) | Nixer (Nyxer) | Oannes | x |
| REVENGERS (The Revengers) | Rotten Gion (Putrid Gigant) | Undead (Flesheater) | Afkar (Edimmu) | Corpseman (Shambler) | Dead Spirit (Phantom Soul) | x |
| THE LADIES (Lady Power) | Dancer | Arachne | Snake Girl (Cihuacoatl) | Vanadise (Vanadis) | Medusa | x |
| WALL OF HELL (Hellwall) | Dandelion (Dandy Lion) | Gnashing (Cipher) | Happilang (Happy Lang) | Winnah (Vigilant) | Stray Cat (Alley Cat) | Mad Bull (Madbull) |
| WATER MAGES | Rain (Rayne) | Rain Tiger (Sea Hare) | Waterflower (Hydroflower) | Splash (Eventide) | Silver Magi (Silver Magus) | x |
Victory over all your adversaries brings you before the Duke of Zweig who rewards you with a Gold Medal, 10000G (that unfortunately do not overflow anywhere so come here with empty pockets) and a mission: go to Podol/Podorui and get the Holy Grail from Leonid the vampire.


HOLY KING/MATRIARCH TRIALS (LANCE, HOLY TEMPLE/MATRIARCH MAUSOLEUM)
While we are in the North and winter is coming, we might as well head to Lance and get trialed.
The Holy King/Matriarch left trials behind him/her, passed through his/her descendants, to choose those who can fight the Abyss and wield the Holy relics.
You and you again, yes, of course.
If you have sealed at least one Abyss Gate, you can go to Lance and the house of the descendants of the Holy King/Matriarch (top-left), upstairs, to get permission to take the tests. Then head to the Holy King Temple/Matriarch Mausoleum (town West exit) and enter.
Note: the Temple acts as a friendly map: you can use the Y button to get out quickly. This doesn't work during the trials, during which you cannot access the Select Menu either (i.e. plan ahead).
In the West Wing, is the Trial of Hunters: you have to hit a ninja with a bow. Thrice. (Flash Arrow works wonders.)
At any time, if you go back one screen you end up at the very beginning of the test. (And you get a surprise if you flee from battle.)
Reward: Fairy/Faeries' Bow.


In the East Wing is the Trial of Royalties (Trial of Royalty). You have a choice between two paths:
- Right: short but difficult (but short)(and not so difficult)(and rewarding): pit yourself against a Red Dragon, a Sunflower and a Giant, from whom you can barehand-catch a very nice Triple/Triumvirate greatsword (and you can run from the fight, or come back again, to get more than one).


- Left: longer road, weaker enemies. (Or so they say! but this was a test of will..) A special enemy awaits: Alice in Wonderland's Cheshire (he laughs at you and goes away if you could not kill it in two turns, which means that if you do not hit it for 7500 dmg in 2 turns, you will not be able to level up your skills! it is arbitrarily renamed 'Angora Wildcat' in the Remaster). Some Inorganic are here too, depending on the path. Thrice you seem to have a choice to go left or right, but the path is basically the same, except at the last fork: at the end you get to fight either a Giant (third fork, left) or a Sunflower (third fork, right).


In this Test too, at any time if you go back one screen you end up at the very beginning of the test.
In the end, several roads: one same reward, the Holy King/Matriarch's Helm.


Now there is one last trial, hidden beneath the Holy King/Matriarch's Tomb (stand in front of it, press A): the Painful Trial (Trial of Hardship).
The R. Knight (R. stands for Roaring in Japanese; 'Rolling Knight' in the Remaster, haha) hits 4 times per round, each time possibly taking 1 LP away. (Putting a character equipped with the Royal Ring out at front considerably lessens the damage.)
A good-looking chest in the next room: the floors crumbles as you open it..


Below, 3x Dancer/Dance Queen & 2x Clown (all powered-up) will Charm you! this is actually the toughest battle so far (because you may just take yourself out). Defeat them fast enough and get a Heartache (cos' you ain't been charm'd, y'know). If you are too slow or run away, they just go away. But if you lose the battle, it's Game Over.


In the next room, full of (easy & fixed) Amphibian, Aquatic & Inorganic monsters, if you go into battle, who plays first depends on the enemy and the average SPD of your active party (which must be over 14 vs. Aquatic, 17 vs. Inorganic, and 20 vs. Amphibian, for you to play first).
Your reward: Holy King/Matriarch's Boots.
With this you have successfully passed the Holy King/Matriarch Trials and gained nice items in the process: well done.

A more detailed version of this map is in the Maps Section
CHASING MAXIMUS (PIDONA, MAXIMUS' HIDEOUT/MAXIMUS'S BASE, DIVINE TOWER/ARCHLORD TOWER)
Kid-napping in Ake/Ache, stealing Holy & Devil King (Matriarchfiend? haha) relics by any means, murdering those sniffing around, giving away Dream Devil 'medicine' in Old Pidona (for what purpose? is another story, we suppose)... all this while posing as the devout head of the Pidona division of the Divine Church/Order... Well, someone has done enough evil deeds: time for some proper retribution.
Trigger: Save Muse from her Nightmare: at this point if you ask the bartender in Pidona, Yamas/Yarmouth or Vanguard for Info, you will hear about Red Coral & the Warm/Tepid Sea Coast (hinting at Great Arc/Arch).


You will thus also need Herman or Black:
1) If you have started the Water Abyss Gate Quest, recruited Herman to get the Dolphin Statue/Figurine and still have him in your party, you can start chasing Maximus at any time now.
2) If you have defeated Forneus (with or without Herman), go to Great Arc/Arch and ask Herman or Black about 'Red Coral' to get him to join.
3) If you retrieved the Dolphin Statue on your own (or LP-killed Herman), you must beat Forneus first. Apparently, Herman's Red Coral dialogue only triggers after Forneus is defeated.
4) If you have not even started the Vanguard Murder Case, Herman's Red Coral dialogue will not trigger either: just start the Water Abyss Quest and recruit Herman when you are looking for the Dolphin Statue: case 1).
Note: Herman's Red Coral dialogue simply adds a bit of backstory (which is always nice ; ).
Careful (SFC only): If you have not completed the 3rd phase of the Business Minigame, do it now. Or never.
Then go to the Divine Church/Order Pidona Headquarters (North-Western corner of town): you gate-crash a party (featuring Ludwig, in case you were wondering what he looked like) and Herman unmasks Maximus, who turns out to be, as you might have guessed, the pirate Jackal, who flees shamelessly using an emergency exit behind the altar. Go after him.


You are now in Maximus' Hideout (Maximus's Base).
Loot everything he has hidden away (2 secret rooms): Stardust Robe, Nut/Achene Gilet, Witch's Eye, Mpotion 3/Divine Liquor, Remedy/Panacea, Soft/Depetrifier, 2800G.
Various sorts of enemies around, in the guise of Divine Church members.


At the end of the path, a LVL10 Ghost (or several of them) and you surface in Pidona Old Town. But where is that Jackal?
Talk to the folks around: the Church people went to the New Town.
Go to New Pidona and ask around: the Church people went to the docks.
And at the docks you are told Maximus has gone to Librof/Ryblov. You know what to do.


Except that in Librof/Ryblov, no sign of Jackal : /
On the other side of Librof/Ryblov: Naj desert, and farther, the Divine/Archlord Tower...
If you have been to Mung/Muenge Village in the East, you have also been to the Divine/archlord Tower and it is accessible from the World Map. Otherwise, here is how.
To enter the Tower, talk to the stationary blue-moustached fat fellow: he 'sells' you robes (you get them for free in fact).
If your main characted is Harid/Khalid, he won't wear that thing (after all, the Divine Church leveled his motherland to the ground): you have to donate 10kG instead. (Is funding the Church any better? mmmh, debatable..)
If Harid/Khalid is in your party as a recruit, you may not be able to get robes nor bribe your way in: in that case kick Harid out, talk to the blue-moustached man again: it should unlock the entrance and now you can either get robes without Harid or get Harid back in your party and donate 10kG to enter.
Note: Be sure to leave plenty of space in your inventory for this journey.
Anyway, now we climb!

The Divine Tower (Archlord Tower) is a lot of floors and rooms and stairs! The architect(s) must have been completely bonkers.
Also, it's more lenghty than difficult.
Loot: Sorcerer/Ascetic's Robe, Life Cane/Staff of Vivacity, Rune Staff/Runic Staff, Mpotion 3/Divine Liquor, Salve 3/Supreme Balm, Salve 2/Quality Balm, Remedy/Panacea, Soft/Depetrifier, Life Elemnt/Root of Life, 1000G.

Incidentally, halfway through, you can find the man in civil Eastern clothes for ManaSword's quest.


Near the top of the Tower you meet Tiberius, the head of the Divine King Church (Divine Order; recruit him if you want to go to Shinon).
Maxi-Jackal-mus joins the fray by landing on the top of the Tower.


Go to the top and fight his monsters (another one with strange pets):
Insect (Bugger/Buggah & Co.), Spirit (Fen/Foehn & Co.), Winged (Griffon/Gryphon & Co.) and a Red Dragon.
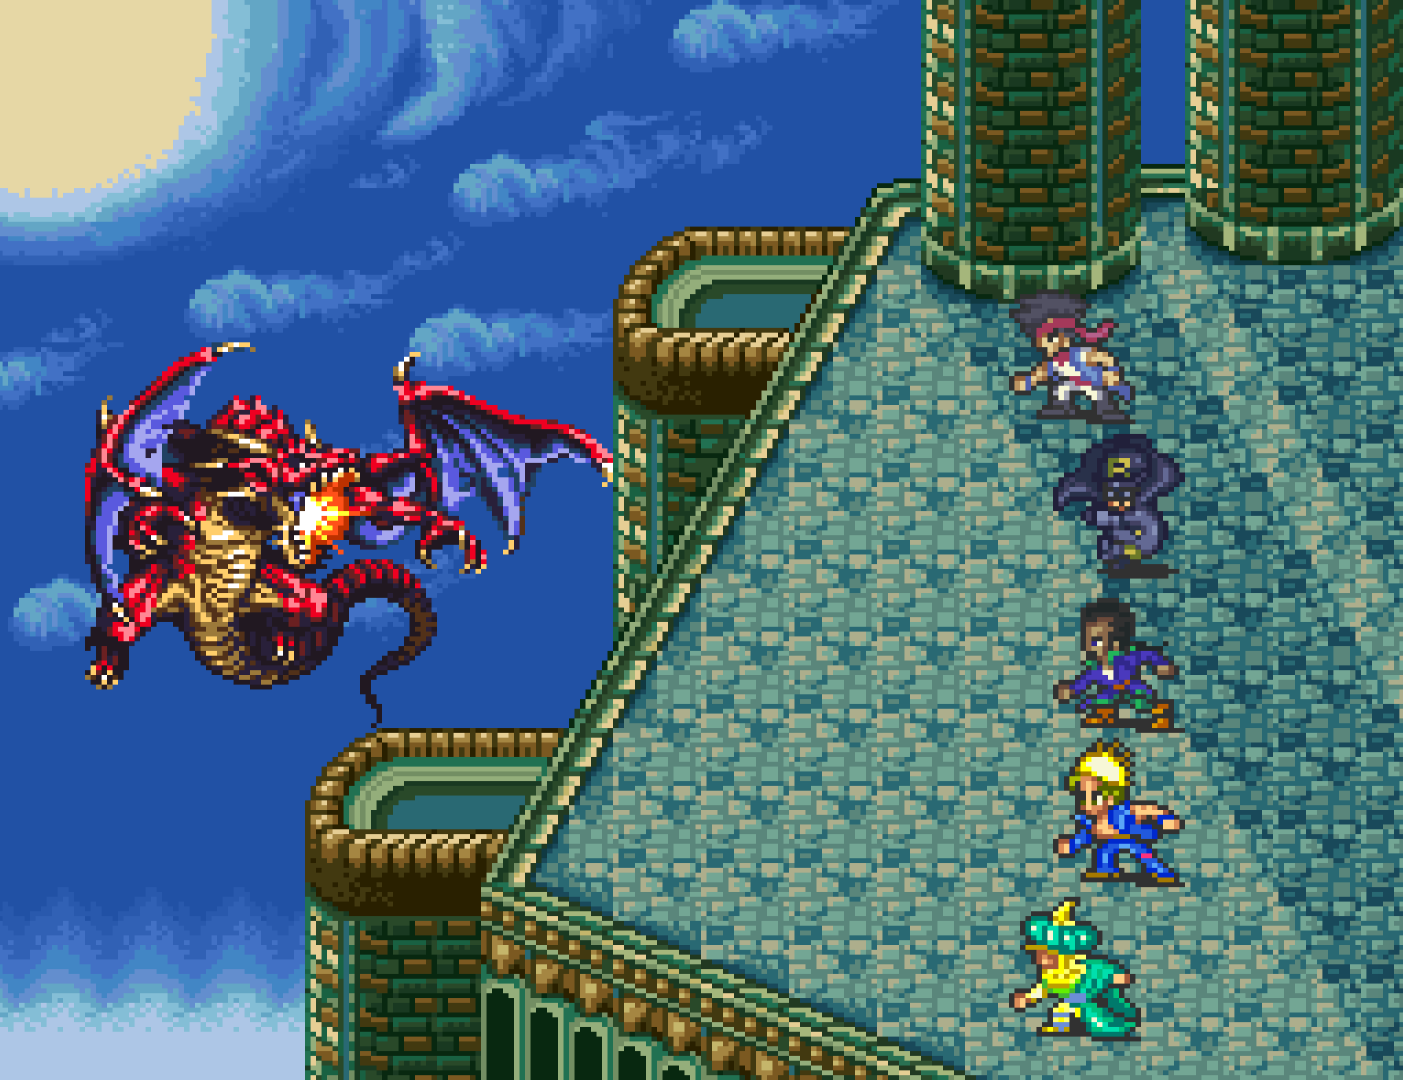


Now it seems you cannot use the elevator to go to wherever Max is: we need to find the switch.
Go back all the way down (notice a shortcut, previously blocked by a church member, between two statues: take it! it has a very cool parallax scrolling over neat graphics! and it's a shortcut, of course) at the start.
Note: You can take a break (exit the Tower, to spend a Night at the Inn for example) now and now only: once you activate the first switch you have to move on and defeat Maximus to be able to get out again.
Now go right at the entrance (the church member blocking the path transforms into a monster, and so will all other church members from here onward): the switch is in the basement, and you have to leave someone behind to hold it (the last team member goes first)... Take the elevator, get to the next switch, leave someone. Next, just when you thought you were free of those switches, the last team member falls in a hole! klutz! Farther down, it's a slime attack and you lose yet another! Next it's an old-fashioned hole-trap! (You did not see that one coming, did you now, haha!)


You are on your own but you have reached Maximus at last.
The good surprise is that, one by one, your party members are catching up!
When all are come, Maximus is joined by 4 guards and they use the Holy King/Matriarch relics (in an act of desperation, I suppose).


Well, you get the Holy King/Matriarch relics: Glory Staff/Staff of Glory, Maquerade, Holy King/Matriarch's Spear, Seven Star/Triones Blade (sword) & Devil King/Archfiend's Axe.
Then you are magicked out of the Tower. Well done!
Notes:
- A party of at least 2 is needed to activate the first switch (the Tower cannot be completed solo). If you are solo, just recruit Tiberius after defeating the Red Dragon. If you have a party of 2 you do not need to leave anyone to hold the 2nd switch. And if there aren’t enough members the traps simply do not activate.
- Maximus: Your friends appear in reverse order (the last party member in your list - the 1st you had to leave behind - will join you first). Glitch: with a party of 4, only 3 nakama will join you for the battle and the remaining member is forced out of the party.
- The number of turns before Maximus v.2 (with his guards) appears depends on the number of characters who rejoin you (transformation after n+1 turns).


THE ANCIENT TEMPLE RUINS (ANCIENT RUINS/TEMPLE RUINS)
The requirements to open the Ancien Temple Ruins may vary slightly, but you have to talk to the old woman in Stanley (bottom-left house) in any case.
・Rather early in game, if the Thieves' Cave (Bandit's Hideout) is not open yet or anymore, you may be able to open the Ancient Temple Ruins. Check the old woman once in a while (e.g. complete a quest and come back, repeat): at some point her conversation will change and she will mention the Ancient Cave Temple, now open on the World Map. See the Invasion Counter Note for details.
・If you have already opened the Thieves' Cave, it may now be infested with monsters: you can clear it first. Enemies: Beastman. Nice strong enemies to fight. The boss looks like a Fairie type, but inside it's a Demon several levels above yours, possibly an Asura. You cannot run away from this battle so be prepared. (Note: if you have Paul with you, he will react as he does in the original Thieves' Cave: he 'see ya's all over again when you leave! whether you have defeated the boss or not. You may recruit him again, of course. This will happen every time you get out of the Thieves' Cave.) Then talk to the old woman again. See the Thieves' Cave Quest for a map & details.


Ancient Temple Ruins:
Before going in, you must find the hint about praying to death, in a chest in the Devil King/Archfiend Palace (you can do that and, while you are there, proceed until the door that speaks to you about a ring at the same time, as you have to go back to the surface anyway). Let us head into the Ancient Temple Ruins now.
Enemies: Beastman, Insect, Plant, Demon, Ghost, Fairy.
Treasure: Death Frag/Deathshard, Life Cane/Staff of Vivacity, Sorcerer/Ascetic's Robe, Barrier Stone, Salve 3/Supreme Balm, Life Elemnt/Root of Life.
Not too far into the cave, you meet a stationary Demon blocking the path, which may be an Asura (the best enemy to spark new techs). This would actually be the only reason why you would want to do this dungeon late in game (the boss, Galatea, has 13k HP and up/spark lvls of 25 & 20, which hints at a rather early completion) and the stationary Demon reappears as long as you do not kill the boss (but then again this game was probably designed so that no grinding is required at all, even for techs, so that you should do with what you have – so it is really up to you, as always). See the Techs section for other spots with Asura to fight.


When you get to the end of the Cave, you reach four sokushinbutsu (mummified monks).
You can complete ManaSword's Quest here (Pray to life with Tiberius) and access Shinon afterwards.


Pray to death to be spinned and plunged in the depths of the earth to meet Galatia (Galatea), a pretty creepy-looking goddess of old!
She attacks with Earth spells (Crack/Tremor, Stone Skin, Stone Bullets), Life Steal and Status (Lullaby, Poison Mist) and physical (Trample) attacks. When you defeat her, everything at the end of the ruins simply disappears as if it had been a dream. Head back out.


The main reward of this cave is the Death Frag (Deathshard) Galatea drops.
Use it to craft Death Bow (Mortuus) or Death Ring (Ring of Demise) in the Workshop, powerful items that also make you undead (cannot be healed): pros & cons! (best fitted to Leonid).

WIND ABYSS GATE (LOOB/LOUV / LOANNE, MOUNT TAFTAN)
Given the stats of the fixed enemies, the Wind Abyss Gate is supposed to be sealed early. But you are given freedom, or are you not?
There are at least two ways to do this:
- answer Mikhail's call and go through Mount Taftan to Byunei/Buné's Lair
- or climb Mount Loob/Louv and talk Gwayne the dragon into helping you.
There is also a third way for completionists.
And possibly an unfortunate turn of events.
Note: Mikhail has a different way to trigger the event and different options. See the Minigame section.
Note: If you originally cannot access Loanne (Monica & Julian Introduction Elope Route), if you do not talk to a bartender to open Loanne after having sealed at least one Gate, and if you defeat Byunei/Buné through Loob/Louv, you will be locked out of Loanne forever. (Which is OK too.)
・1) Through Mount Taftan and Byunei's Nest/Buné's Lair


After closing one Abyss Gate, you can hear, in various pubs (Pidona, Yamas/Yarmouth, Vanguard), that Loanne is under attack: it means that Mikhail is looking for help to defeat Byunei/Buné, and that you can now access Loanne Castle, usually closed to the public: go talk to Mikhail and accept to start the quest and get access to the top of Mt. Taftan.
Note 1: If you ask Anna about the Gates and listen to Poet/Minstrel's Old Song, the event may not occur unless you kill Gwayne. So if you want to recruit Poet/Minstrel before heading to the Wind Abyss Gate, just listen to the New Song.
Note 2: Mikhail has a special Loanne Event.


Have a look inside the castle: most main characters can recruit Julian, and Monika or Mikhail. Check the Characters page to learn of the subtleties entailed in the recruitment of those three individuals (if you want to keep access to Loanne Castle, for one reason). Note: You may notice that you do not have access to Loanne Castle Armory: too bad! but you have more than enough stuff already, have you not?
Mt. Taftan is directly South-East of Loanne, on the same World Map screen. If you hadn't opened Mt. Taftan on the World Map already, here is how.

Enemies: Serpent, Plant, Flying, Beastman, Skeleton, Demon, Life Trap.
Treasure: Drgn Scales/Dragon Scale, B. Dragon/Soryu Armor, Sorcerer/Ascetic's Robe, Martial/Budo Gi, Barrier Stone, 2x Mpotion 2/Spirit Liquor, 2x Tpotion 2/Strength Salts, Spirit/Faerie Stone.
If you have explored Mt. Taftan before, you can start from the Middle Camp (two screens up). (And if you had reached Byunei/Buné's Den once, instead, you can go straight from the foot of the mountain to the Den.) If not, climb up!
Run (Y button) to jump from ledge to ledge. Go North through the fog.
And you are soon into Byunei/Buné's Den. Gotta love what she's done with the place.
Inside are found Life Traps, sort of little plant aliens (pulsing holes in the ground), which can be annoying (4200 HP, i.e. more HP than each mini-boss, very high phys def, with Hypnotize, Life Steal, Life Break & al.). Use cheap and powerful waza like Training Cane/Bladed Cane's Draw Sword/Quick Draw, Triple/Triumvirate's Dancing Sword or any def-ignoring tech (Aiming/Aim, Instant Power/Pressure Point..) and protect yourself with the Hypnotize/Hypnosis & Lifesteal/Life Steal Evade Skills and Royal Rings.


Don't forget to loot the skeletons lying around (with their skull standing straight and the jaw visible)(they sparkle in the Remaster edition).
You soon meet Byunei's Bird, Dog & Baby (Buné's Byrd, Hound & Imp). 3k HP each, quickly dispatched.
They drop the B. Dragon (the Blue Dragon Armor, Soryu Armor in the Remaster, of the Wind element).
And you are already at the Gate.


Then Byunei (Buné) is there for you.
Every 3k dmg, thrice, one of her real heads appears, and her last form has 9k HP. Her attacks intensify as heads appear, but it should not be too hard (no insta-kill waza). Equip the very convenient Stare/Gaze Evade Skill if you have it. When defeated, she drops a Drgn Scales/Dragon Scale (used to craft items at the Workshop).


You can now go to Loob/Louv Mts. & Gwayne's Den (map below) to defeat it, if you want to (or if you just want a second Dragon Scale).
・2) Through Mount Loob/Louv and Gwayne's Den

Enemies: Spider, Plant, Winged, Spirit, Amphibian, Ghost.
Loot: Drgn Scales/Dragon Scale, Barrier Stone, Guard Ring/Ring of Fending.


Mt. Loob/Louv is directly West of the Small Village/Tinyville.
The start is a pretty, autumnal landscape. Go up the mountain and down in the Den (the weird fumes and mist slow you down). The path is, as usual, quite straightforward. And at the end you meet Gwayne (Gwein, Gwain), a dragon that does not rejoice at meeting you.


You are given a choice:
- you can challenge Gwayne and defeat it: you get a Dragon Scale, but no sense of completion or achievement..


- or you can talk to it: you learn pieces of information about the Devil Lords/Sinistrals (you have been fighting mere reflections, weak clones of their real selves, that cannot fully cross over, that is, until they get their hands on the Destined Child) and about Gwayne (its mother Dora fought Byunei/Buné alongside the Holy King/Matriarch, but she was later killed by him/her). (Note: Listening to Poet's Old Song in the Small Village gives you the full chronicle of Holy King//Matriach and Dora.) Nevertheless, Gwayne agrees to fight Byunei/Buné with you (the enemy of my enemy..). And off you go.


Aren't you glad you didn't kill the beast?
A neat boss battle ensues, you riding the dragon, in the sky, vs. the Wind Abyss Guardian, Byunei (Buné).
Gwayne can attack too (the best move is the dual attack Twin spike).
Byunei/Buné reveals her heads progressively (4 forms in total, 3x3k & 1x9k HP).
Contrarily to her Taftanian version, she is immune to Ground & Throw; but apart from slight variations in her attack pattern, she is the same beast.
If you are defeated here, a special bit depicts your fall through the skies, to your doom!
When you defeat her, you find a Drgn Scales/Dragon Scale (use it to have fine stuff order-made at the Workshop).
Note: Ally Gwayne's Hot Cold Bolt stats are maxed (50) so if you have it use its Flame, Cold Air or Electricity attack, have your main character use a repeater tech (like Split Body/Doppelslasher) and if Gwayne plays right before its rider (which is usually the case), you are in for extreme damage with the repeater tech.


If you want, you can now go to Loanne, Mt. Taftan & Byunei's Den/Buné's Lair to loot the place (see section above).
The Den is now completely deserted, with the exception of the Life Traps, still active.
・3) I Want It All: Through Mount Taftan & Byunei's Den/Buné's Lair & back, & through Loob/Louv and Gwayne's Den to the end
There is actually a third way to play this part: go to Loanne, climb Mt. Taftan, go into Byunei's Den/Buné's Lair, defeat Byuni Bird, Dog & Baby (Buné's Byrd, Hound & Imp), but don't fight Byunei/Buné. Instead, go back down the mountain, rest, go to Loob/Louv & Gwayne's Den, and defeat Byunei/Buné with Gwayne's help.
This is the only way you can fight the mini-boss in Byunei/Buné's Den (and get the B. Dragon/Soryu Armor) and 'befriend' Gwayne. You get the full tour.
In any case, you can now get the strongest Wind spell (Dragon God Descent) for free from Anna in Lance.
・Appendice for Dragon Riders
If you have defeated Byunei/Buné on Gwayne's back, there is a possibly sweet-bitter sequel to this dragon story.
First, without any ado, go back and visit Gwayne in its Den in the heart of Mt. Loob/Louv to get an easy 10kG reward.


Now you can ask for info in the Pub of Pidona or Vanguard to learn that Gwayne has destroyed the Small Village/ (Tinyville, and supposedly barbecued & eaten everyone in the process, ofc). It seems one cannot fight its genes nor its blood (in other words: Dragons Make Poor Pets; Like Mother Like Son).


You can leave Gwayne be and let it to do what it does, which is fine.
Or you can go find Gwayne in his Den (Loob/Louv) one last time. Talking to it won't help: challenge and kill it (drop: Drgn Scales/Dragon Scale). The Den caves in.
You are left alone at the top of a silent Mt. Loob/Louv..


Note: Gwayne, A Behavioural Study
If you are a completionist, you might have noticed that your encounter with Gwayne changes depending on several factors.
Gwayne has 3 conversational patterns:
・If you have closed the Wind Abyss through Taftan, closed all 4, or not closed any (case 1A), or if the Small Village/Tinyville is destroyed (case 1B), Talking to Gwayne is useless. But if you Challenge and kill it, in case 1A you get 10kG (plain plunder, I suppose), and in case 1B you get nothing and the cave crumbles (scenario described above).
・If you have closed at least 1 Abyss Gate (not the Wind Gate), or if you have talked to Anna about the Gates and listened to Poet's old song in the Small Village/Tinyville, Challenging and defeating Gwayne will net you 10kG. On the other hand, Talking to Gwayne with a main character with any skill/magic LVL above 15 will start the sky-borne battle with Byunei/Buné (described above). If you don't have any skill/magic LVL of 16 or more, Gwayne will laugh at your weakness: level up and come back.
・If you have defeated Byunei/Buné with Gwayne and have not heard about the Small Village, when you visit Gwayne, it reminisces what a piece of cake Byunei/Buné was and gives you 10kG for reaching its Den again.
That's about it!
To WALKTHROUGH PT. 3